The Optical Tube
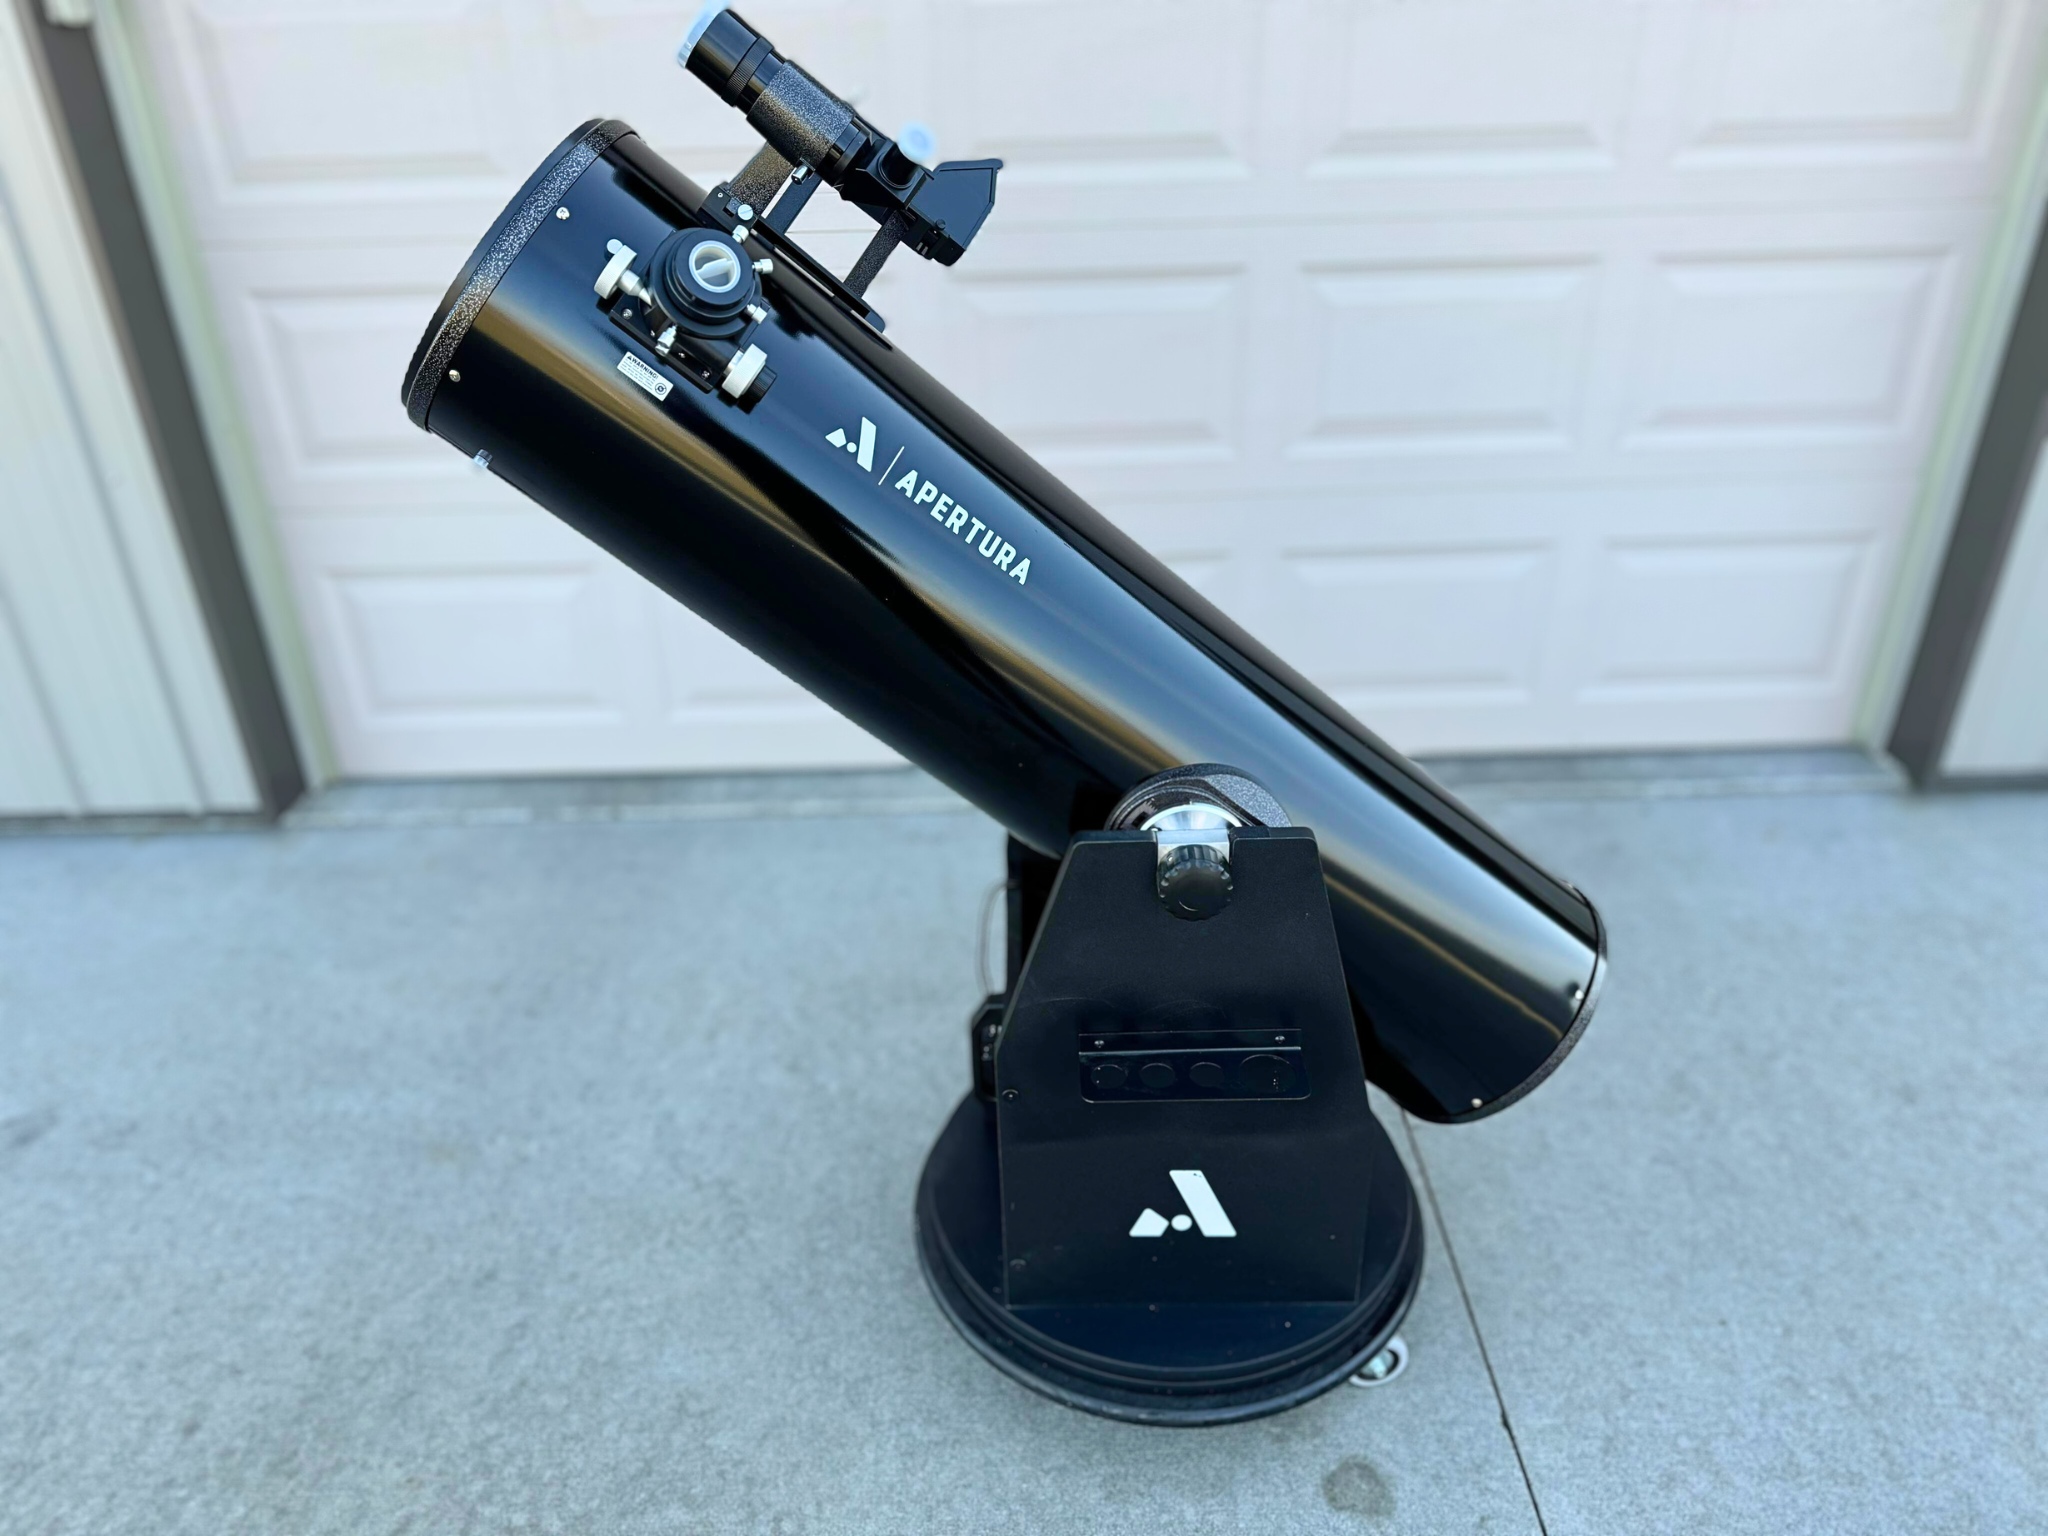
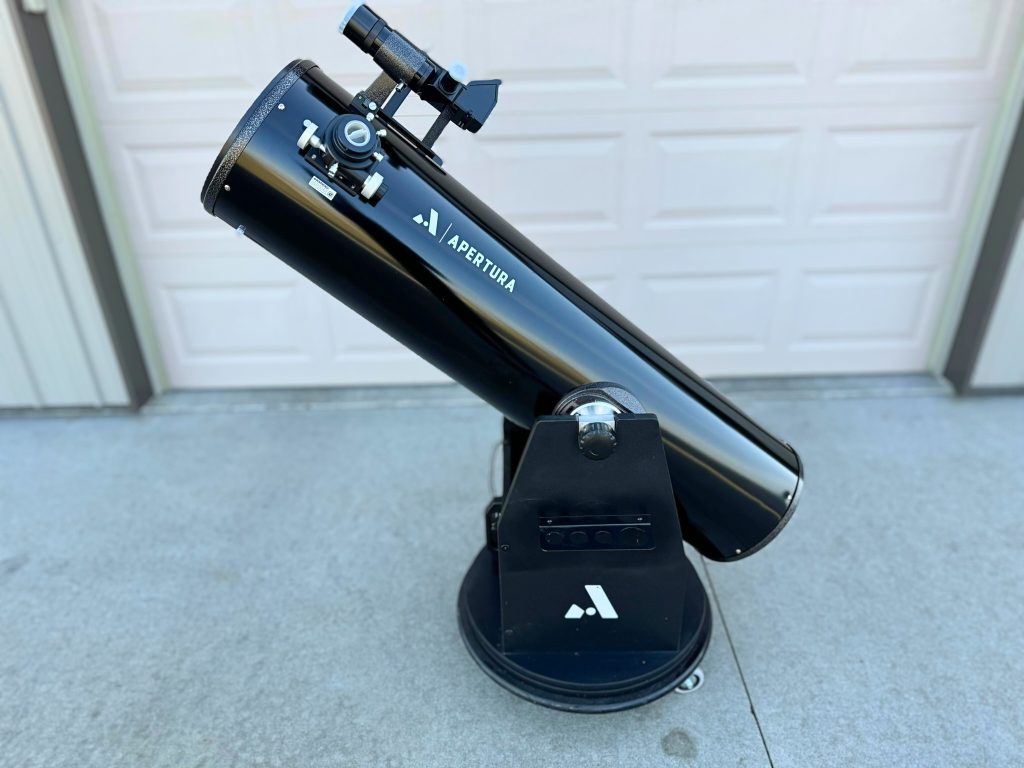
I’ve seen many different marketing claims about what the primary mirror of the Apertura AD10 dobsonian is made of. Some say it is made of Pyrex borosilicate glass. In fact, it is an ordinary BK-7 optical glass, which cools down negligibly faster than soda-lime plate glass.
If there’s a noticeable temperature change outside, you’ll need to let the scope sit outside for a little while to acclimate to the cold. The scope has a built-in battery-powered fan, which is intended to speed up this process. But you’ll still need to give it some time. Also, remember to turn off the fan while actually looking through the telescope; otherwise, the vibrations from the fan will make for a less-than-steady image.
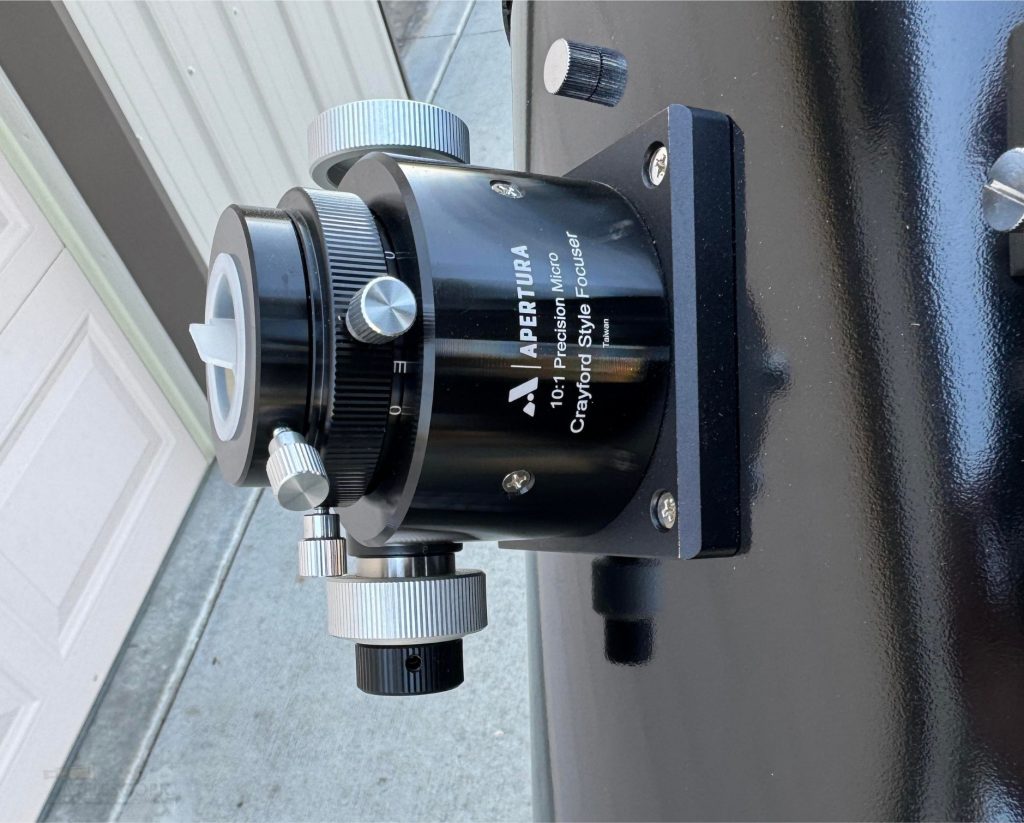
The focuser installed on the Apertura AD10 is GSO’s standard 2” dual-speed Crayford, which is provided with a variety of popular Dobsonians, imaging Newtonian astrographs, Cassegrains, and Ritchey-Chretien instruments. It has a brass compression ring instead of thumbscrews to grab your eyepieces without scratching them. The focuser includes a 1.25” adapter with filter threads and a compression ring fitting on it as well.
I’ve found the AD10’s plastic front cap prone to getting stuck and sometimes tough to securely latch into place. You may want to punch a hole in it to add a handle.
Collimation of Primary & Secondary Mirrors
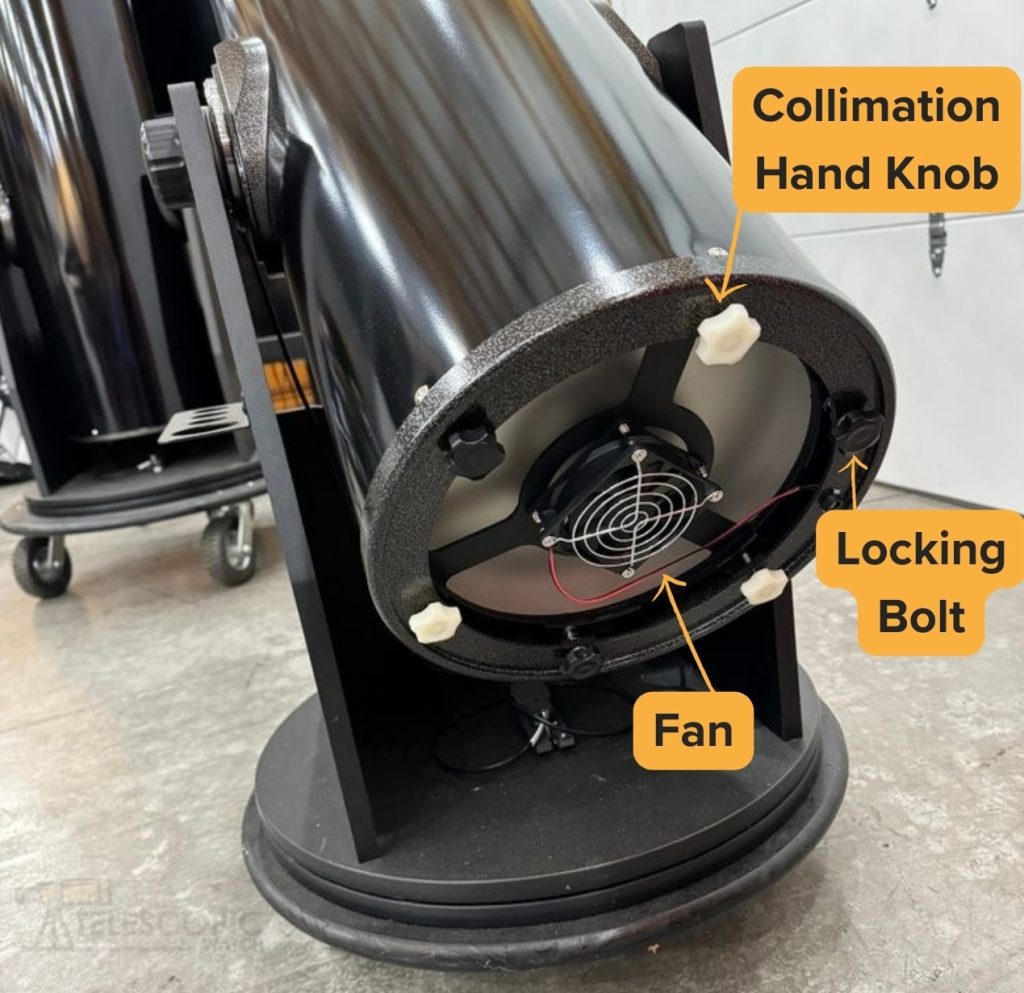
The AD10 is quite easy to collimate, and the primary doesn’t require tools to adjust thanks to its hand knobs and spring-loaded mirror cell. This is in contrast to some scopes that require a screwdriver to do the same job. The included “locking bolts,” on the other hand, are a useless, almost decorative component that does nothing but complicate collimation and may potentially damage the mirror and/or cell if the telescope is dropped; simply remove them.
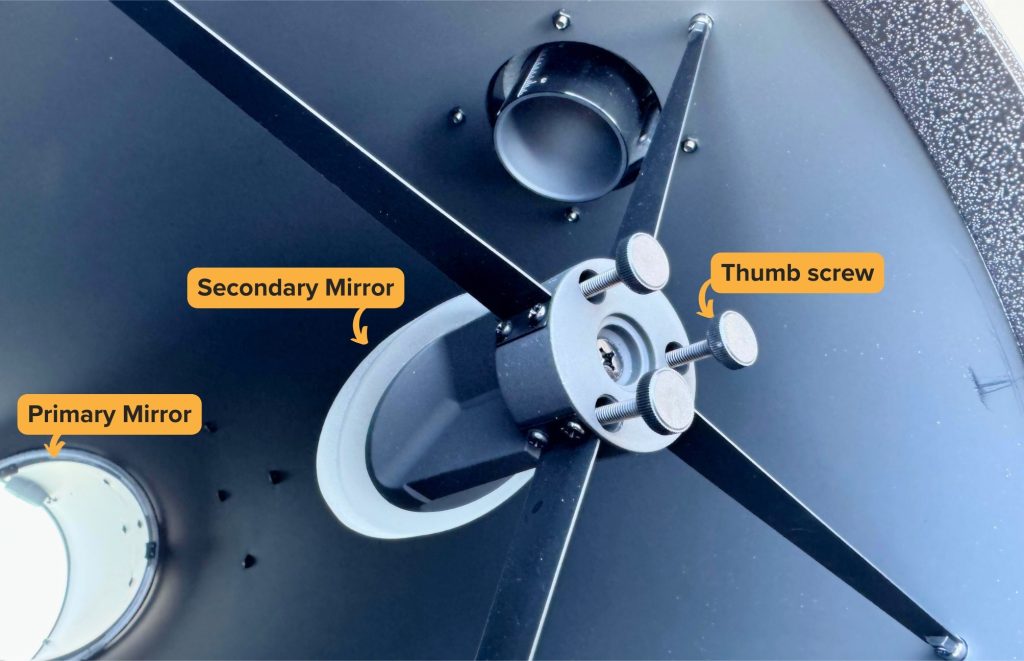
The AD10’s secondary mirror requires a hex key to adjust but should rarely, if ever, require one. Replacing the hex screws with thumbscrews, which I have seen many trying to do, ends up just being a source of temptation. Also, the thumbscrews, if replaced, will come loose far more often.
Portability of the Optical Tube
The AD10’s optical tube should have no trouble fitting across the back seat of most cars, or in the worst case, you can fold a seat down. In fact, it’s shorter than some 8” scopes, so you should be able to easily transport it to dark skies.
You need not purchase a case for the AD10 or any sort of bag. Wrapping it in a towel or coat will work just fine, and it’s easier to carry and fit without a cumbersome casing of some kind.
Weighing about 33 pounds (15 kg), most people shouldn’t have too much trouble moving the tube, though its size and smooth metal surface can make it somewhat awkward. Some people buy or make lifting straps or add additional handles to make life easier.
Accessories
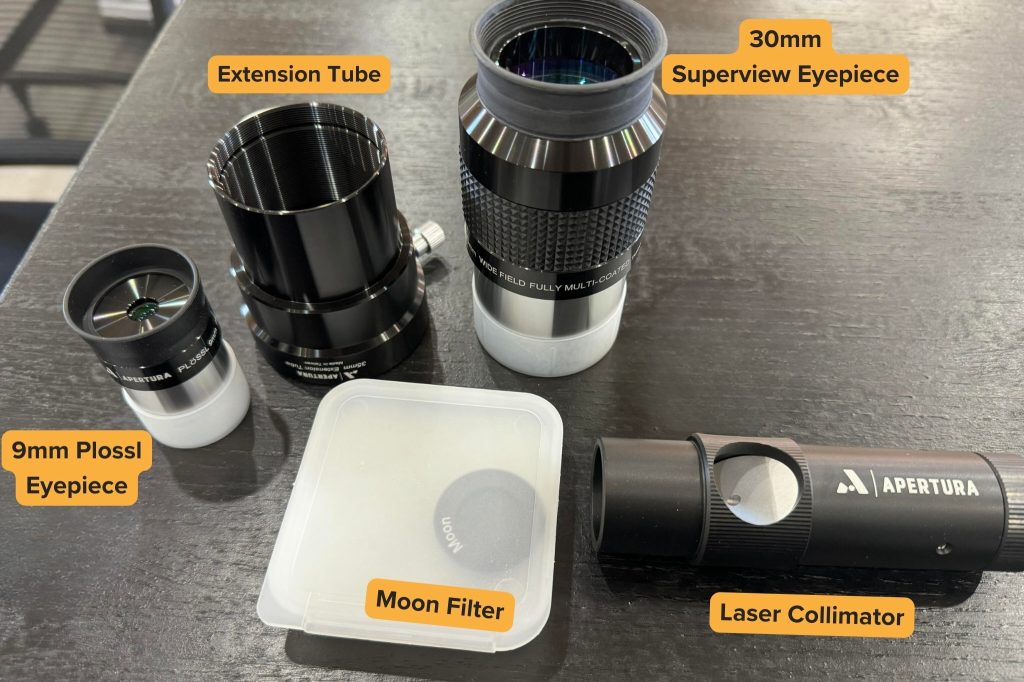
The Apertura AD10 is provided with a 9x50mm right-angle correct-image finder scope, a laser collimator, a low-quality 1.25″ “Moon filter,” and two eyepieces: a 2″, 30mm focal length “SuperView” (42x) and a 1.25″ 9mm Plossl (139x).
RACI Finderscope and Laser Collimator
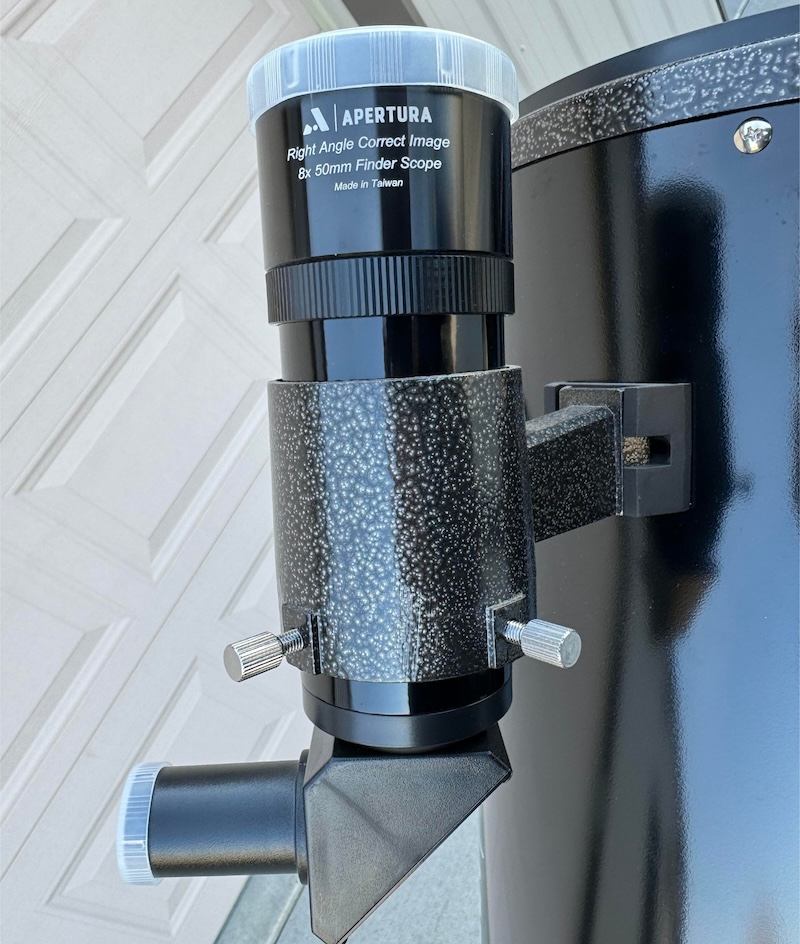
Even when there is a lot of light pollution, the well-made 9×50 finderscope works very well.
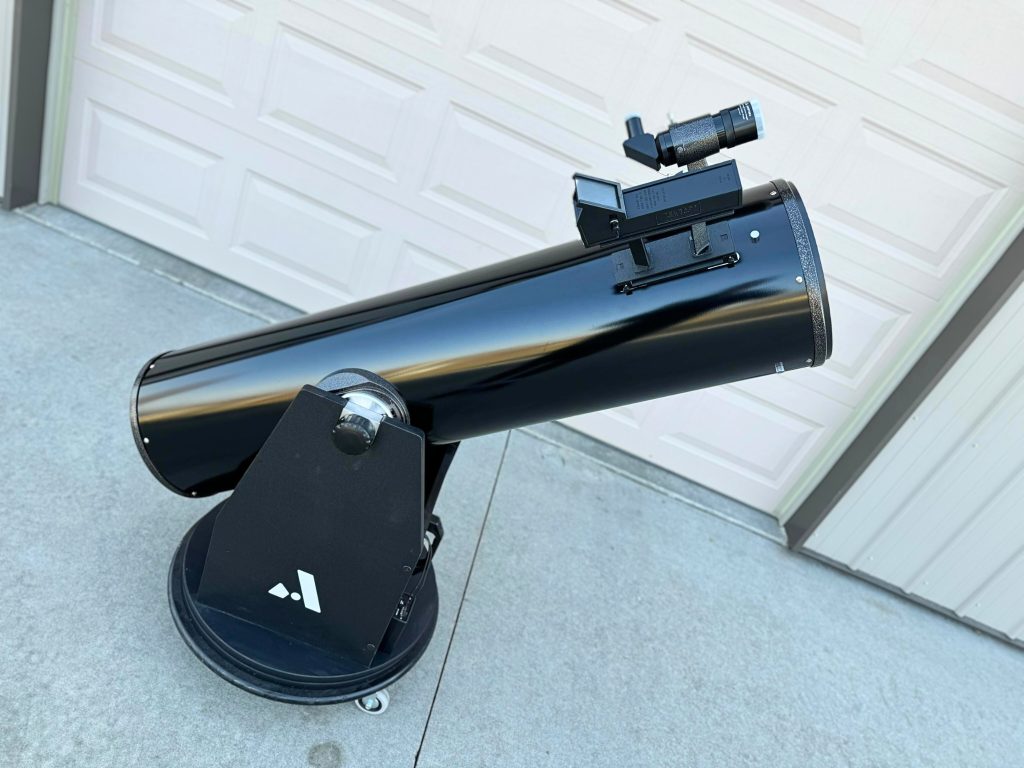
Beginners may find the 9×50 RACI finderscope difficult to use, and its crosshairs are difficult to see in the dark. It takes some practice to line up the sight along the tube and then look through the finder to get close to your target without missing it by a lot. If you find it hard to use the 9×50, you might want to add or replace it with a red dot finder, Telrad, or other zero-power reflex sight.
The 1.25” barrel laser collimator included with the AD10 looks fancy and is supposed to make collimation a breeze, but it’s basically useless out of the box unless you get lucky.
The laser is not square with the barrel most of the time, and squaring it up is a time-consuming, painstaking process. If the laser isn’t square to the barrel, it can’t be used for accurate collimation, and it may even make things worse. A collimation cap, or Cheshire, is a better choice.
The SuperView and Plossl Eyepieces
The 30mm SuperView 2″ eyepiece that comes with the AD10 and gives 42x magnification is a pretty good choice for low magnification. The coma that’s inherent in the telescope and the optical design of the SuperView combine to make the stars at the edge of the field of view look like “seagulls” or “crosses.” The SuperView is mostly an Erfle design that hasn’t changed much since the 1930s, and it’s not really made for telescopes that work faster than the focal ratio of f/6.
The 30mm SuperView is still vastly better than a standard Plossl, offering a significantly sharper and wider field of view and being easier and more comfortable to look through. The apparent field is about 68 degrees.
The other eyepiece provided with the AD10, a 9mm 1.25” Plossl, provides 139x magnification. It doesn’t have a ton of eye relief, and thus you have to jam your eye into it to see the whole field of view, which is only about 45 degrees. That is quite narrow by any standards and almost claustrophobic compared to the SuperView’s 68 degrees.
However, the supplied 9mm Plossl eyepiece is quite sharp—sharper than a lot of 9/10mm beginner eyepieces out there. And 139x is a good magnification for viewing small targets like the Moon, the planets, double stars, globular clusters, and planetary nebulae. On a decent night, the AD10 can handle a lot more magnification than that with additional eyepieces.
Moon Filter: The Only No-Good Accessory
The “Moon filter” provided with the AD10 is complete junk. It’s just a piece of green-tinted plastic and only fits the 9mm eyepiece anyway. It does nothing but tint the view and, of course, blur it quite a bit. So you really don’t need a Moon filter. Even viewing a full Moon through a very large telescope at low power can’t harm your eyes. You’ll just be dazzled for a few minutes at worst, and even the best Moon filters reduce sharpness and contrast somewhat.
The Dobsonian Mount of AD10
Like all Dobsonians, the Apertura AD10 is an alt-azimuth-mounted instrument. The telescope pivots up and down on two side bearings attached to the tube and swivels sideways by spinning the top part of the base against the bottom part. The difference is that the AD10 uses bearings more in common with a piece of fine industrial machinery and less with a regular Dobsonian, which just pivots on essentially different types of plastic.
Mount’s Azimuth Motion
For azimuth, or side-to-side motion, the Apertura/GSO Dobsonians use roller bearings—essentially a “lazy Susan” with a couple dozen tiny plastic rollers pushing between the telescope’s ground board and the bottom face of the rocker box.
This is cheap, smooth, and works well, but many users find it to be too loose and easily spun—particularly a problem when using it on a windy night or with multiple inexperienced observers (e.g., children or at public outreach events). It can also be frustrating to track at high power with this setup, as you can easily overshoot your target.
Tightening the base’s center bolt tends to lead to the opposite problem—now you can’t easily move the telescope. Thankfully, replacing the lazy Susan with furniture glides PTFE (Teflon) pads like an ordinary Dobsonian uses can be done cheaply, and some companies even sell kits for it. The melamine surface on the bottom of the rocker will move smoothly against either.
Mount’s Altitude Motion
The AD10’s altitude (up-down) bearings are sealed ball bearings with large plastic knobs/clutches to adjust their tightness, which thus changes the ease of moving the telescope up and down. You can also completely tighten them to lock the telescope in place for storage or to swap out heavy accessories if necessary.
You can shift both bearings back and forth with a hex key along a track attached to the tube to adjust for the center of gravity with different accessories. This is best done ahead of time indoors, as adjustment in the field is a huge pain, particularly with regard to lining them up with each other evenly.
Mount’s Base and Build
The AD10’s entire base is made out of particleboard, which is the norm for most mass-manufactured Dobsonians.
The whole thing arrives packed flat and can be assembled with the provided screws and tools in a few minutes, just like flat-packed Ikea furniture.
Since the base is made of particleboard, it is likely that you will damage it through regular use. If you don’t live in a very dry area, it will eventually fall apart due to moisture damage. When it does eventually expire, you could just make a replacement out of plywood or buy one and have a much more durable unit that weighs less too.
The AD10’s base weighs about 29 lbs (13 kg), but due to its density and awkward size, it is somewhat annoying to lug around. The aforementioned solution of a replacement plywood base would help here. You can also get a hand truck or dolly to wheel the whole telescope around if the weight and size still sound intimidating to you.
Should I buy a Used Apertura AD10?
A used AD10 is a great scope. The main problems to watch out for are damaged mirror coatings or a damaged base. A damaged base (or an outright missing one) is easy to replace relatively inexpensively, so you don’t need to worry about it as much. The mirror coatings are a bigger problem. If they just look dull, they may simply need cleaning. However, a mirror with pinholes or transparency in the coating will need a recoat, which can cost several hundred dollars. A good coating may last a lifetime, but if recoating costs a significant amount, it may not be worth it compared to the cost of a brand-new instrument.
Don’t worry about any dents to the tube; they’re almost inevitable anyway. Most dents do not enter the light path and can thus be ignored. If any dents exist that somehow get into the light path of the optics, you can remove them with the same tools used to remove dents on a car—or even just a plunger or hammer, if you’re lucky. So don’t be too concerned.
Alternative Recommendations
The Apertura AD10 is easily one of the highest-quality, best-valued telescopes available in its price range, or to beginners overall. If you can’t find an AD10 in stock due to availability or your geographic location, as we’ve mentioned previously, the Zhumell Z10, Orion Skyline 10”, Omegon 10” ProDob, GSO 10” Deluxe, and Bintel 10” Dobsonians are all similar or identical to the AD10. These telescopes are all made in the same factory by GSO and tend to have the same features with minor variations in the mounting and accessories, or occasionally the paint job. The Apertura DT series Dobsonians are also very similar to the Apertera ADs but lack many of the accessories and have a slightly different mount design.
Under £700
- The Apertura AD8/Zhumell Z8/Orion SkyLine 8 is merely a scaled-down AD10. As with the AD10, this is an excellent pick. However, apart from budgetary reasons, I honestly wouldn’t recommend you downsize to an 8” from the AD10. The tube length and width/weight of the base are identical and the AD10 weighs just a few pounds more than the 8” models, but provides significantly more light gathering power and resolution with otherwise identical features, accessories, focal length, and overall portability.
- The Explore Scientific 10” Hybrid Dobsonian is significantly more portable than the AD8 or AD10 thanks to its truss tube design, which allows it to collapse down into a much smaller package than it would otherwise. The overall design of the mount is also a bit better, particularly with regards to reaching balance with heavy eyepieces and other accessories. However, you only get a single-speed Crayford focuser, the included red dot finder and low-power eyepiece are basically unusable, the scope needs a shroud to keep light out of the optics and the eyepiece by default is at a rather uncomfortable 90-degree angle. By the time you upgrade the 10” Hybrid properly, the price works out to be similar to that of the AD10. So you’re really paying for portability and not so much in the way of value when you compare the two scopes side by side.
- The Sky-Watcher Virtuoso GTi 150P has significantly less light gathering or resolving power than the AD10 due to its mere 6” of aperture, but features full GoTo and motorised tracking controlled via your smartphone or tablet, and can be aimed manually without ruining your alignment. The scope also can be stored in a backpack or luggage and set up in minutes thanks to its tiny tabletop Dobsonian design and collapsable tube. A manual version is available as the Heritage 150P for a lower price with otherwise identical features, and a 130mm f/5 version of both the Heritage and Virtuoso GTi telescopes is also an option for a lower price.
£700-£1100
- The Apertura AD12/Zhumell Z12/Orion SkyLine 12 has the same features and accessories as the AD10/AD8 but with 12” of aperture. Scaling the scope up to a 12” f/5 does mean, however, that the tube is long enough to no longer fit in most vehicles, the particle board base is heavy and awkward to pick up, and the scope is quite tall when assembled – kids will need a step stool to look through it as will shorter adults. If you’re in good shape and have enough room in your home/vehicle, this scope is a great choice – but if you’re worried about portability the AD10 or a truss tube 12” might be a better option.
- The Celestron StarSense Explorer 10” Dobsonian is a bit more convenient, lightweight, and portable than the AD10 thanks to its trimmed, weight-optimized base and the carry handles installed on the tube. It’s also a joy to use and aim around the sky with Celestron’s StarSense Explorer technology. However, you don’t get a lot else for your money – the focuser is a single-speed 2” Crayford and not a dual-speed, there’s only a single low power eyepiece included and there’s no cooling fan or collimation tools like what’s included with the AD10. An 8” model of the StarSense Explorer Dobsonian is also available, but as with the other 10”/8” comparisons, the 10” outperforms it without being much heavier or bulkier and thus we’d really recommend the 10” if you can afford it.
- The Explore Scientific 10” Truss Tube is very similar to the Hybrid that Explore Scientific also offers, but with an improved dual-speed 2” Crayford focuser and a lighter weight and more well-designed upper end (apart from the fact that its open frame requires you make a plastic liner to keep stray light out, along with the de facto mandatory shroud for the trusses). Unless you really care about maximum portability, however, it’s probably a better idea to just get the Hybrid and ignore or upgrade the single-speed focuser, and the included accessories are pretty much garbage as with most of the Explore Scientific telescope offerings.
- The Celestron NexStar 6SE is of course a lot less capable than the AD10 due to its smaller aperture and limited field of view, but you do get a fully motorised/GoTo telescope with some astrophotography capabilities, and it’s fairly easy to transport. If you absolutely require a telescope on a tripod, this is one of the few ones I would solidly recommend, however.
Aftermarket Accessory Recommendations
The AD10’s bundled 30mm and 9mm eyepieces will get you started, but you’ll need something additional for greater magnification at the very least. You don’t have to spend a lot, though. The oft-cited 6mm “goldline” or “redline” produced by a number of manufacturers such as SVBONY, is inexpensive and widely used, providing 208x with the Z10. A 4mm Astromania planetary eyepiece will deliver 312x for a little more power, which will typically be the limit under average viewing circumstances-besides, tracking the telescope manually at greater powers is somewhat difficult. The Z10 is a pricey scope, and while premium eyepieces are ideal, these two low-cost options will suffice.
Once you’re happy with your higher magnification eyepiece collection, the next step is to get something for medium magnification—a single eyepiece between 12mm and 18mm, or both 12mm and 18mm eyepieces would suffice.
Although a 15mm, 1.25” gold-line eyepiece is available, it works poorly with the Z10’s steep f/5 light cone. The 15mm Agena Starguider 1.25” eyepiece is our favorite since it’s easy to use, crisp, and the 60 degree apparent field isn’t too narrow.
Another great accessory is a high-quality nebula filter, especially an ultra-high-contrast (UHC) filter. Some experienced observers swear by an oxygen-III filter in addition to a UHC, but this is expensive and might be overkill in most cases. While a UHC filter won’t completely eliminate the effects of light pollution and simply doesn’t work at all on stars or galaxies, it will substantially darken the sky backdrop and boost contrast for most nebulae by allowing only a few spectral lines of light through-specifically, the spectra of oxygen-III, hydrogen-alpha, and hydrogen-beta emission lines generated by the ionized gases in nebulae. This contrast increase is useful even if you have fairly pristine skies, as the background in the eyepiece is never completely black, even under a dark and starry night sky. I recommend the Orion UltraBlock 2” UHC filter; it can be screwed onto the filter threads of the AD10’s adapter for use with 1.25” eyepieces.
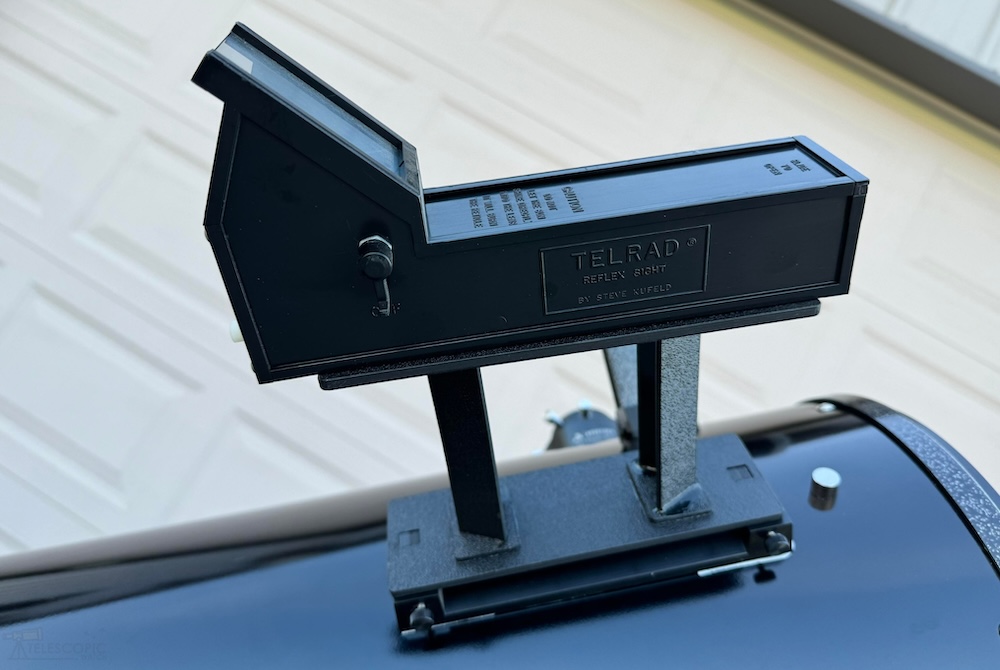
Finally, as previously said, you’ll very probably need a zero-power red dot finder or reflex sight, which displays a dot or bullseye in front of your naked-eye view of the sky, similar to a pistol sight. The Telrad and the Rigel Quikfinder are the two market leaders in this category; the Telrad is a big empty box that runs on AA batteries, whereas the Rigel Quikfinder is lighter, less prone to dew, and takes up significantly less real estate in the AD10’s optical tube, but it requires hard-to-find and expensive CR2032 batteries and suffers from the reticle drifting when you move your head, which makes it a bit less accurate. Either type of finder attaches to your tube with no drilling with the included sticky double-sided mounting tape, though drilling a hole in the tube and adding screws is a more secure and long-lasting mounting option if you’re comfortable with doing such an operation.
What can you see with Apertura AD10?
Because of its large aperture and high-quality optics, I find the Apertura AD10 a very useful instrument for all types of objects. Despite what many detractors may claim, the “light bucket” status of large Dobsonians helps not only with deep-sky objects, but also with small targets like globular clusters, distant galaxies, the planets, and fine details on the Moon. However, a telescope larger than 12-14″ rarely gets to utilize its full resolving power due to the limitations of atmospheric conditions most of the time, so 10-12” is usually going to give you the best planetary views under typical skies.
As for what the resolution capabilities of the AD10 might show you in the solar system, firstly, you’ll be able to observe the phases of Mercury and Venus, but not much else. Mercury can only be seen when it is high in the sky, and it has few high-contrast characteristics, whereas Venus’s cloud deck obscures its near-molten surface, but some viewers may spot striations and black marks in the clouds on occasion. On a clear and steady night, you’ll struggle to count how many craterlets you can see in locations like Clavius, where you can view thousands of ridges and mountains only a few miles wide and map out the small craters Neil Armstrong used on the final approach during Apollo 11, such as Moltke, a small but reflective crater 4 miles (6.5 km) wide and about half a mile deep.
Mars shows an ice cap or two, and if there’s a global dust storm, you’ll see it. Under optimal conditions, when Mars is at its closest to Earth, you can actually spot dozens of dark markings or even Olympus Mons with a skilled eye and steady air, but most of the time only a few are visible. Mars’ moons can also be seen if you can block out the planet’s glare from the field of view; Deimos is moderately challenging, but few people ever get to see Phobos.
You’ll almost always be able to at least see a polar ice cap on Mars, and you’ll notice if there’s a planet-wide dust storm too, as it obscures the ice caps and any other features. With a trained eye and stable air, you may be able to see a couple dozen dark markings, some of which are just dark sand and a few of which are actual geological features, but only when Mars is at its closest approach to Earth. However, under most lighting conditions, only a few markings are visible, the easiest of which are Syrtis Major and Mare Cimmerium. If you can block out Mars by using a high-power, narrow-field eyepiece or occulting bar, you can see both of its tiny moons, at least in theory—Deimos is already quite a challenge to spot, but few people ever manage to see Phobos.
Jupiter’s cloud belts are easy to see with the AD10, and Jupiter’s four biggest moons, Io, Europa, Ganymede, and Callisto, are clearly small disks and not bright points of light like stars. To see the details of any of them, you need bigger equipment and perfect conditions. You can also see the shadows of all 4 moons when they transit the planet, which is a frequent occurrence, and during transits, it’s easier to tell the different sizes and colourations of each moon too.
Saturn’s rings, as well as the Cassini Division inside them and several weakly visible, low-contrast cloud bands on the planet itself, are all easily visible. With the AD10, you can see a half-dozen of Saturn’s moons, including Titan, which has a visible gold disk. The moons Rhea, Tethys, and Dione are a little trickier, while Enceladus and Mimas are considerably more difficult, and you may also be able to spot Iapetus and Hyperion further away from the planet. On a really clear night, the considerably more difficult-to-spot Encke gap in Saturn’s rings can also be observed.
The AD10 will show you 3 or 4 of Uranus’ moons if you’re lucky, while both of the ice giants are bluish, featureless dots. Neptune’s moon Triton can be faintly seen, and Pluto is at least theoretically possible to spot if you can distinguish it from the hundreds of similarly dim stars littering its current location in the constellation Sagittarius. On a good night, Ceres and Vesta, the two largest asteroids, are visibly not star-like points, and you might even be able to tell that Vesta is not round and appears a gold-yellow colour.
If you’re lucky, the AD10 will show you three or four of Uranus’ moons—Titania and Oberon are the easiest, while Ariel is a bit tougher, mostly due to its location closer to Uranus. Umbriel is tricky to spot as it’s significantly dimmer than Ariel and, like Ariel, is close to Uranus and thus within its glare. Uranus itself is a small turquoise disk with no discernible surface features or rings (these can only be seen with meter-class telescopes and spacecraft).
Neptune is a bit trickier to locate and identify than Uranus; you can barely see it with the 9×50 finder (as opposed to Uranus, which is actually visible to the naked eye under dark skies) and cannot distinguish it clearly from a star without very high magnification. The biggest giveaway is that Neptune’s deep blue colour is different from any other star likely to be nearby, but even this can be rather subtle. Neptune’s only large moon, Triton, which is the size of Pluto and extremely reflective, is a bit easier to spot than Uranus’ moon Titania, at a similar brightness but without the glare issues from its parent planet on account of Neptune’s lower reflectivity and greater distance from the Sun than Uranus. In good conditions, it’s not too hard to see Pluto with the AD10, but it’s surrounded by thousands of stars that are about the same brightness. You can also tell Ceres and Vesta, the two largest asteroids, and the former is also the current titleholder for the smallest dwarf planet, are not points, and Vesta is visibly out-of-round at very high magnifications on account of its ellipsoidal shape.
What you can see outside of the Solar System with the AD10 or any instrument is highly associated with the quality of your night sky. For best results with any telescope, you really should be able to clearly see the Milky Way overhead at night, which correlates to a 4 or 5 on the Bortle Scale. Star clusters appear fantastic even in light-polluted settings, however, and the AD10 can clearly resolve globular clusters at high magnification. The brightest clusters, such as M13, M3, and M22, are easy to resolve; the smaller ones, like M53 and M79, are a bit tougher. Some globulars have a distinct morphology that sets them apart from the rest. For example, M15 has a fairly tight core, M13 has its dust lanes (and a coincidentally nearby spiral galaxy in the same field of view), M92 appears to be somewhat out-of-round, and M4, located right next to the bright star Antares in Scorpius, scarcely seems like a globular cluster at all owing to its low density.
The AD10 will show detail in thousands of galaxies and the beautiful spiral arms of several dozen of them at a dark sky site with the Milky Way clearly visible overhead, whereas under a city sky, only the brightest galaxies can be seen as pale, dim shadows of their former selves, with little to no detail visible besides the occasional dust lane or elongated ovoid shape.
The AD10 will show you details of thousands of galaxies and the beautiful spiral arms of several dozen of them at a dark sky site, but only the brightest galaxies under a city sky, with little to no detail visible besides the occasional dust lane in objects like M82, the Cigar Galaxy, or M31, the Andromeda Galaxy. Under dark skies, however, you can see the spiral arms of M51, the Whirlpool Galaxy, and many others too, like M33, M81, and M101. The Virgo Cluster shows dozens of galaxies, often with several in the same field of view at a time, and the Coma Berenices Cluster of galaxies also has quite a few targets, often close together.
You can also, of course, spot thousands of beautiful open star clusters, ranging from the gigantic Pleiades, with its faint glimmer of reflective dust visible under dark and clear skies, to small and obscure open clusters from the NGC or IC catalogs that may be embedded within larger targets. Plus, there are always double stars, of which tens of thousands are resolvable and many of which tend to have interesting colours.
Emission nebulae such as the Swan (M17), Orion (M42), and the Lagoon (M8) look spectacular with the AD10, especially under dark skies and/or with a filter, but they are still stunning even under fairly light-polluted conditions. More emission nebulae, such as the Trifid and Rosette, are also fairly conspicuous under darker skies and/or with filters. Small planetary nebulae show turquoise or blue colours, while larger ones such as the Helix, Ring (M57), or Dumbbell (M27) are complex and detailed but pale shades of gray.
Lastly, the AD10 can show you thousands of open clusters and double stars. Some open clusters are correlated with nebulae, such as the ones inside the Rosette or Lagoon Nebula, or the wispy nebula that surrounds the Pleiades (M45). Others have dark dust lanes running through and around them, often gravitationally bound to the clusters themselves. There are also numerous pairs (often merely coincidental alignments) of open clusters, like the Double Cluster, M35 and NGC 2158, M46/47, and more. Double stars present an interesting challenge to the resolving power of your telescope as well as the night’s seeing conditions, and they frequently come in interesting colour combinations.
