Finders are essential pointing devices. Now that we have a telescope that will gather light and an eyepiece that will magnify the image, we need a way to accurately point the telescope at what we want to see, our target for observation.
Finders have a wider field of view than the typical telescope. Depending on what low power eyepiece is used, the typical amateur telescope will likely have a maximum field of view of between .7 degrees and 3 degrees. Naturally, some will be narrower and some can be wider, but this is a good example range.
This means that you can only see a small portion of the sky through the eyepiece. Imagine trying to find something you lost and having to look for it while viewing through the cardboard tube of a roll of toilet paper. Your field of view would be quite small which would make it hard to find things.
A finder’s field of view can range from about 4 degrees to as wide as your eye can see. This makes it much easier to find what you are looking for in the sky. So the finder and the telescope work together as a team to help you locate and see your target.
Also, depending upon our observing location, the type of finder you may prefer can depend on how dark the sky is, how dark the ground area is and whether we can see the target with our unaided eye. If the target is invisible we will require some optical assistance in the finder to see it.
Types Of Finders
Finders fall into two major categories, magnified and unmagnified. Each has its advantage and it is not unusual to have both on larger telescopes.
There are several types of unmagnified finders. These include site tubes, red dot finders and those which present rings projected onto the sky. We will take a look at each.
Unmagnified finders are typically lower cost than the magnified finders, but that does not in any way diminish their value. They just cost less to produce.
Magnified finders are essentially small refractor telescopes. Some are of a straight through design, like half of a binocular. Some have a diagonal that turns the light 45 or 90 degrees to put the finder image in a convenient location for the user. Some have a fixed magnification and some can have variable magnification through a zoom feature or replaceable eyepieces. We will discuss them all and provide some examples.
An important part of any finder is the mounting bracket. After a finder is mounted on the optical tube, the telescope, you will need to fine tune where it is pointing so that it aligns perfectly with the field of view of the telescope. This holder usually has adjustment knobs or screws to move the finder about so you can get the finder and the telescope perfectly aligned. If the holder does not keep the finder firmly in place it will frustrate your efforts to use it.
Finally, for a finder to be useful you have to align it to the scope. We will go into the alignment of finders later.
Unmagnified Finders
As the name implies, these finders do not magnify anything. In fact, you usually use these with both eyes open so you can see the entire sky as you use the finder to move the telescope to the target location.
Sight Tube – This consists of a hollow tube with crosshairs at each. You look through the tube and align the front and back crosshairs on the target to point your telescope. The crosshairs might be etched on plastic or glass. Sometimes they are a crossed pair of wires at each end.
You could easily make a sight tube at home. The longer the tube the more effective the sight tube will be. As long as you can see the target with your naked eye the sight tube will work.
Sight tubes are typically found on very low-cost telescope packages that you would find in the big box store or perhaps a toy store. They require no batteries and so are maintenance-free. If the bracket is well made and the adjustment screws work properly a sight tube can be quite effective.
- Red Dot Finders

Red dot finders, RDFs, are the most popular of the unmagnified finders. You will find them on entry-level scopes and on expensive scopes. They project a small red dot onto a plastic or glass plate so that it appears to float in the sky. You align that dot with the target and your scope is ready for you to view through the eyepiece. Better RDFs have a variable intensity dot so that you can dim it down so it does not wash out the target.
There are so many examples of red dot finders. Some of the more popular would be:
- The Celestron Star Pointer
- Celestron Star Pointer Pro
- The Orion EZ Finder
- Orion Laser Finder
- Projected Ring Finders
Likely the most popular of this type of finder is the Telrad. A series of circles are projected onto a screen so they look like they are floating in the sky. The rings represent a known field of view so you can use them to move through the sky in measured amounts.
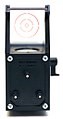
As you can see in the picture, the Telrad projects three circles. The smallest ring is ½ degree. Then we have 2 degree and 4 degree rings.
Telrads can be used in place of red dot finders and offer much greater versatility. The rings are extremely useful in star hopping which is a method of finding targets in the sky. If you put a starting point star in the centre of the ring you can identify how far away other stars are that are visible in the Telrad. By moving the rings across the star field a known amount you can hop from star to star to find a target.
Telrad finder charts take advantage of these rings. These charts are usually specific to a limited set of targets. The chart shows you where to start and how much to move the scope for each hop as you move the rings across the stars.
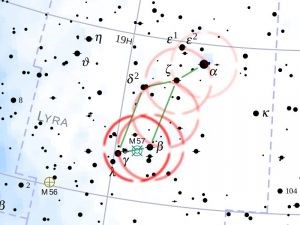
For general use charts, you can make rings out of wire that cover 4 degrees of your star chart and move them around the star chart to simulate how you would move the Telrad rings around the sky.
The chart shown in the picture has Telrad rings placed on it. You would start in the upper right which is the bright star Vega. Then you would progress to the next star and the next until you reach the bottom location which would have the Ring Nebula, M57, which is not visible to the naked eye but would be centred in the Telrad central ring.
Now that you have the telescope in the right location you go to your low power eyepiece and look around that area. Sure enough, there it is. This method of finding your targets is called star hopping. The Telrad is one of the best tools available for star hopping.
The Rigel Quikfinder is another example of a projected ring finder. Some people prefer this finder because it is smaller and lighter than the Telrad and will fit in places the Telrad won’t fit.
The Quikfinder projects a ½ degree ring and a 2 degree ring. In the picture, you can see a comparison of the rings projected by the Rigel quick finder vs. the Telrad.
- Laser Pointer Finder
The laser pointer finder is often based on the same type of hand laser used for presentations. When used at night the laser pointer projects a line into the sky that can be used to point the telescope. This is not as precise as a red dot finder or a Telrad, but it is a quick way to point the scope into the general area you want to view.
Laser finders are best used in combination with other finders or telescopes that have a very wide field of view that approaches that of a finderscope. You use the laser for quick positioning and then go to the other finder or a wide field eyepiece for more precise positioning or star hopping.
In the picture, you see a laser pointer finder mounted on one of my telescopes. I use this primarily in the warmer months as the laser does not work very well when it is cold. In the winter I replace it with a red dot finder.
One thing to take into consideration when using a laser pointer finder is that the projected beam can be seen by aircraft in the area. In fact, if you were to point it at an aircraft you could interfere with the pilot’s vision placing the pilot, the aircraft, and the passengers in danger. Doing so is a criminal act in some areas. Many public observing gatherings ban laser pointers for this reason.
If you are going to use a laser pointer finder be VERY careful to be sure that there are no aircraft anywhere in the area where you are using the laser. Turn it on only as long as you require to point the scope, then turn it off.
Another reason that lasers may not be welcome at group observing sessions is that it can interfere with astrophotography. The bright laser beam can ruin their exposures. Take these points into consideration before buying a laser pointer finder device.
Magnifying Finders
Magnifying finders are basically small refractor telescopes. Or you can think of them as half of a binocular as their aperture, magnification, field if view, and specifications more closely resemble binoculars.
Common specifications for finders are 6X30, 8X50 and 9X50. There are 5X24s available but they are typically very poor quality often sporting plastic lenses that yield a very poor image. You only see these on very low-end telescopes. I would not recommend buying one.
Magnifying finders can have straight through designs, like a handheld spyglass or binoculars. Or they can have diagonals, like a telescope, that bends the light to a more comfortable angle for the user.
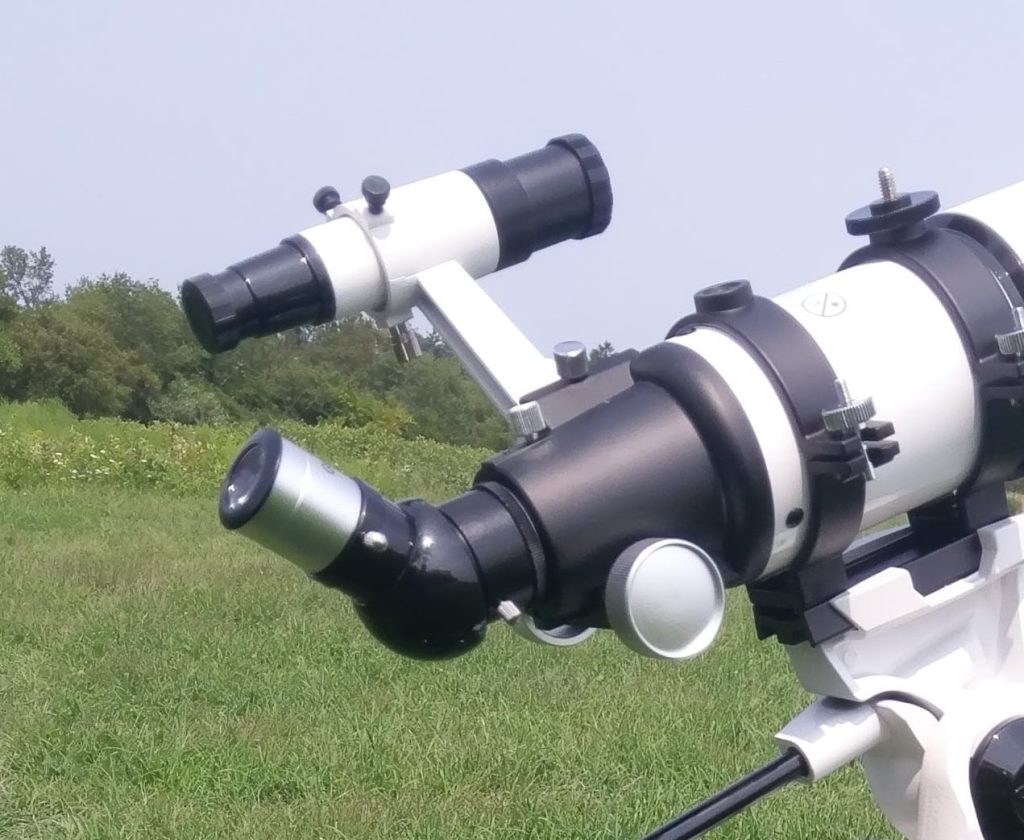
In the picture, we see a 6X30 straight-through finderscope that was included with my 80 mm refractor. The straight through design works well on this scope as I use the scope from the rear of the optical tube.
The finder on this telescope is mounted with a standard dovetail shoe. I sometimes swap this finder out for a red dot finder or a laser finder, depending on where I am observing. The magnifying finder works better for me at more light polluted areas where I can see very few stars with my eyes. I like the red dot finder better when I have darker sky conditions and can see more stars with my eyes.
The orientation of the image in a magnifying finder can vary from device to device. Some will present an inverted image that is also reversed left to right. Some finders are correct up and down but reversed left and right. This is not as strange as it sounds as there is no up and down or left and right in space. However, if you are using the finder to star hop it can be a bit confusing at first, but most people get used to it.
Then there are the correct image finders. These usually incorporate some kind of prism, similar to a binocular, which corrects the image so that it is presented correctly up and down and left to right.
Next, we find the right angle finders. These have a diagonal, similar to the diagonal found on most refractor telescopes. This puts the eyepiece of the finder at a 90-degree angle. Depending on what kind of scope you have this may be very desirable.
For example, Newtonian telescopes have the eyepiece on the side. So a right angle finder would place the finder eyepiece in line with the telescope’s eyepiece. However if you are using a refractor or catadioptric, where the eyepiece is at the back of the tube, you may find a straight-through finder preferable.
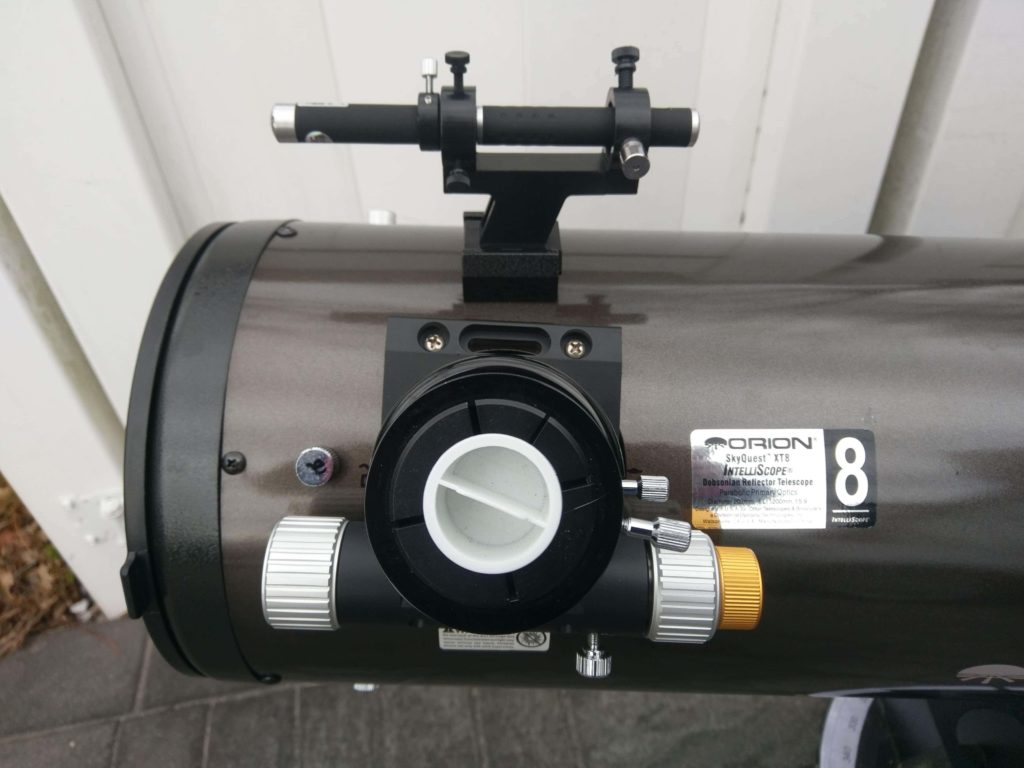
A common designation you should know is the RACI finder. RACI stands for the right angle correct image. In the picture, you see the Orion 9X50 RACI finder on my 8” Newtonian telescope. Note how conveniently oriented it is compared to the eyepiece. This allows me to move from finder to eyepiece with ease and without having to get up from my observing chair.
Also note that I have a second finder on this telescope, a laser pointer finder. I use the laser to get into the general area then move to the 9X50 RACI finder to do my star-hopping or other locating tasks.
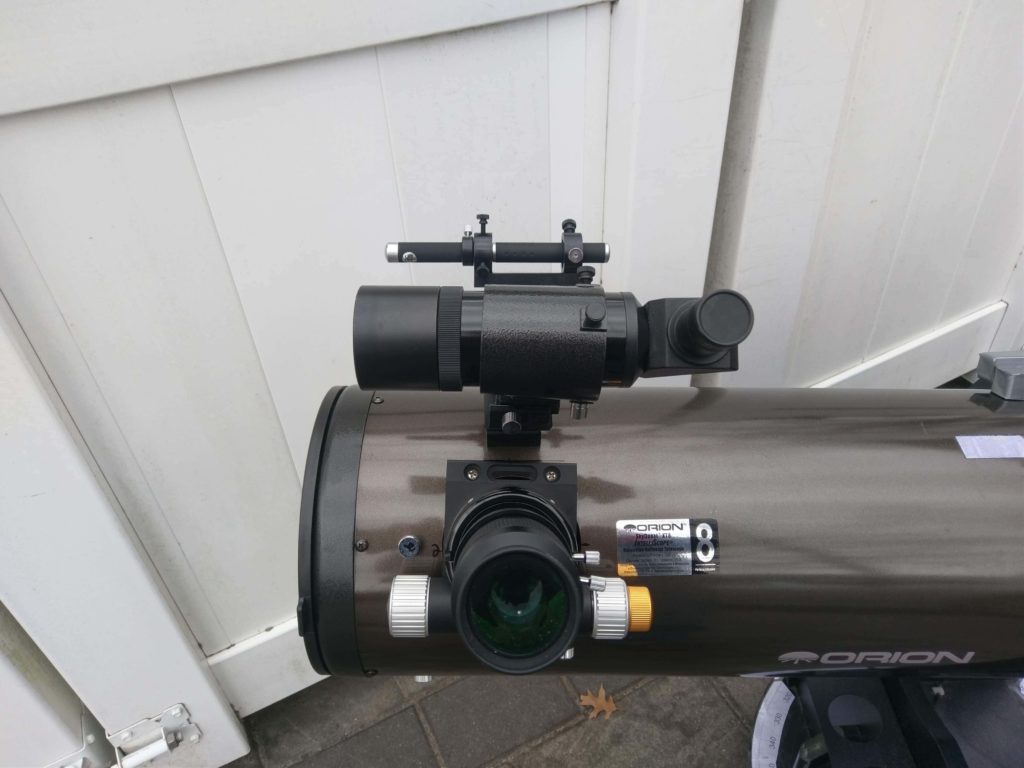
While you can add finders directly to your telescope, some would require you to drill holes to add the mounting shoe. If you would prefer not to do that you can use a dual finder bracket that fits into the shoe that is already on your scope. This Orion dual finder bracket is a good example. I use one of these on the Newtonian scope that is shown in the picture above.
I use a laser on this particular scope because a red dot finder would require me to stand or kneel and bend into an awkward position to see the red dot. But the laser allows me to point the scope without having to bend into difficult positions. I do switch to a red dot finder in the winter, when the laser does not work well due to the cold. I also switch to the RDF if I am going to be at a large observing session where the laser might disturb people.
Once finders get past 50 mm in aperture they are often able to have replaceable eyepieces, just like a regular telescope. In fact, these 60 to 80 mm finders can do double duty when placed on a large telescope that has a long focal length and a narrow field of view.
Having a 70 mm finder with replaceable eyepieces is like having a second telescope that is optimised for low power wide views. You can use it as your finder or view things just as you would a 70 mm telescope. Its wide field of view will allow you to see things that the larger scope might not be able to fit into its field of view.
My personal experience is that magnifying finders become more important and valuable in light-polluted locations. They allow you to see stars that you cannot see with your eyes alone. Thus the value of a red dot finder or Telrad type device may be reduced since they can only see what you can see with your naked eye. This is a great time to team up two types of finders.
Here are some examples of magnifying finderscopes of different designs.
- Orion 9X50 RACI
- Celestron 9X50 Illuminated Finder
- Astromania 6X30 Finderscope
- Zerone 60 mm Finderscope
- Orion 70 mm Finderscope
Finder Eyepieces
This is a low power eyepiece that maximises the field of view of your telescope. When used with your other finder(s) this can be a valuable tool when you are looking for hard to spot targets. Sometimes your target cannot be seen even in your magnifying finder and you have to go to the eyepiece.
My strategy is to always have an eyepiece that gives me the widest possible field of view for each of my telescopes. For refractors with a 1.25” diagonal, this is usually a 32 mm Plossl. For Newtonian, SCT, and MCT telescopes this is usually an eyepiece that will provide the lowest power specified by the manufacturer for your telescope. In this case, you also want the apparent field of view, AFOV, specification eyepiece.
In a telescope with a 2” diagonal/focuser, this will likely be an eyepiece of 32 to 40 mm focal length. In order to maximise the field of view, you will want an apparent field of view in the 65 to 70 degree range.
Naturally, this eyepiece can be used for other purposes than finding. Large targets like the Andromeda Galaxy, the Pleiades, the Hyades, or the North America Nebula are very large so you would like to have the widest view eyepiece you can when viewing them.
So, if you read something about “finder eyepieces”, this is what people are talking about. It is not a special purpose eyepiece, just one that maximises the field of view of your telescope.
Aligning a Finderscope
Regardless of what kind of finder you are using you will have to align it with the telescope. The procedure is fairly simple and is best done during the day. The key thing is that you are aligning the finder to the telescope and not the other way around.
You want to do this during the day using a fixed land object. At night the things in the sky are moving which makes it more difficult to get the alignment correct.
During the day, set your telescope so that you can see a distant object, at least ¼ mile away and farther is better. I prefer the cross arms on a telephone or power pole. That gives me a very well defined target right where the cross arm meets the pole. But the top of a chimney, a letter on a distant sign, or something similar can work as well. This is your alignment target
Here are the steps to follow.
- Using your low power eyepiece point the telescope at the target and get it centred in the field of view of the eyepiece. Ignore the finder for now.
- Switch to a high power eyepiece and again, get that target centred
- Lock the scope into position in any way you can. You don’t want it to move
- Look through the finder and spot the target
- Using the adjustments on the finder bracket adjust the finder until the target is centred in the finderscope.
- Go back to the eyepiece and make sure the scope has not moved. The target should still be centred
- Check the finder again and make any final adjustments
When the finder and the telescope both are lined up on the same point on your target, you are all set and ready to take your telescope out under the stars.
Finders have a tendency to get bumped or moved, especially if you take off at the end of your observing session when you put the telescope away. When you first start an observing session do a check using a bright star. You should be able to do this quickly so the fact that the star is moving should not be a problem.
- Put the star in the centre of the finder
- Look through the eyepiece and centre the star in the eyepiece
- Go back to the finder and make any small adjustments that may be needed to centre the star
- Compare the view in the eyepiece and the finder to be sure they agree
This quick tune-up at the start of your observing session will save a lot of time throughout the evening as your finder and your scope will be in the best alignment possible for the evening.
Summary
- Finders are an important part of the telescope package
- They can be magnifying or unmagnified
- It is not unusual to have more than one finder on your scope, especially larger telescopes
- Do your initial finder alignment during the day
- Do a quick finder adjustment at the beginning of each observing session
I hope you found this useful. Don’t hesitate to leave a comment below.