


XX12i’s Stellar Optics Quality
The optical quality of the XX series of Orion scopes is outstanding. As with the now-discontinued Orion’s XT series, I’ve rarely heard anyone complain about them. The XX12i and XT12i have both given me fantastic lunar, planetary, and deep-sky views.
The primary mirror sits on a 9-point floatation cell with a cooling fan on the back.
The focuser on the XX scopes is Orion’s dual-speed 2” Crayford model. It works almost as well as a more expensive unit like a Moonlite or Feather Touch, based on my experience using them all. Most users will probably never need to upgrade to one of those expensive focusers.
A Note On Assembly and Disassembly of the Truss Tubes
The XX12i’s tube, when disassembled, turns into a 66 cm long lower tube assembly, eight 56 cm long truss poles, and a 20 cm long upper tube assembly.
The assembly process of the optical tube is pretty simple and takes only a few minutes.
I attach the lower part of the tube to the Dobsonian base, and then I use the hand knobs to connect the four pairs of truss poles. The upper tube assembly then sets on top of the trusses and is secured using four hand knobs.
The main disadvantage I see of using such a truss system is that stray light can shine into the open tube far more easily, causing glare and contrast loss. This is easily solvable by purchasing or making a light shroud, which is essentially a black Spandex or Lycra sock that fits around the trusses. Orion and various third parties sell them, or you can sew your own out of Lycra.
The Very Well-Made Dobsonian Mount
The XX12i’s mount is made out of MFC/MDF, as is typical with Chinese-made Dobsonians.
Unusually, unlike on the now-discontinued Orion’s smaller XT scopes, which use a bearing of melamine or whatever covers the whole base directly on cheap Teflon pads, the XX12i and larger XX scopes use real ebony star on chunky, thick Teflon pads for the most buttery-smooth motions possible.
The tube is secured to the mount with two hand knobs, which also adjust the tension/friction on the attitude axis. While it’s a little less convenient and less ideal compared to the spring tensioning system on the regular XT scopes, I think this system is much easier for the IntelliScope’s encoders to install on.
My Difficulties in Transporting the Mount
I assembled the mount with a series of included screws and an allen key, which took only a few minutes. But unfortunately, I find myself doing this often.
The fully assembled mount is tall and wide enough that it is quite difficult to fit it into my car without accidentally scratching the car’s inside. This is quite a big inconvenience to deal with on a regular basis, I confess.
With this routine assembly/disassembly of the mount, I’m actually risking chipping it or exposing the MFC/MDF (which easily warps and rots) to moisture damage. Unfortunately, I can’t really replace the base with a plywood unit without removing the IntelliScope functionality due to the way the encoders are installed.
The Low-Effort Eyepieces
The eyepieces included with the XX12i are a bit of a token effort.
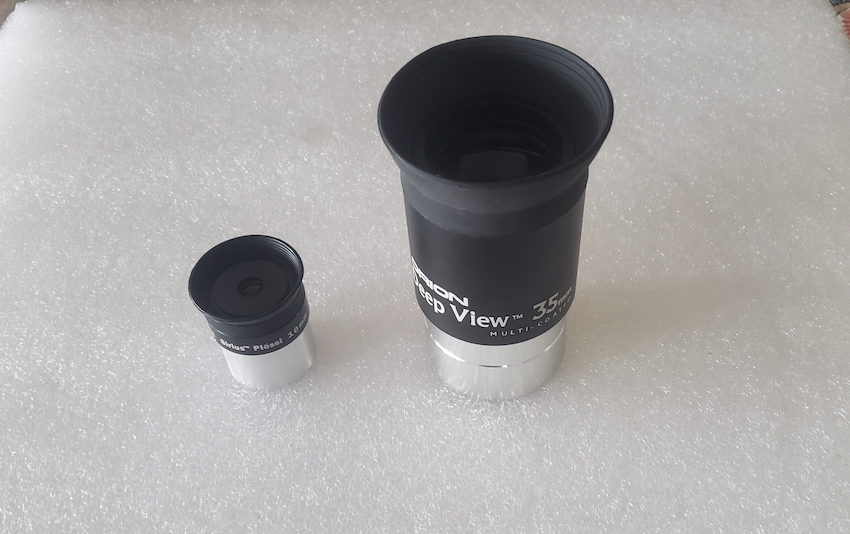
The 35mm DeepView (a glorified Kellner) performs rather poorly at the XX12i’s fast focal ratio of f/4.9 and actually provides too low of a magnification (42x) to be of much use. The exit pupil of 7.09 mm is so big that many users will see image brightness loss, and the shadow of the secondary mirror is also visible at the centre of the field.
The 10mm Plossl (150x) is acceptable, but we’ll want something better.
The XX12i and XX14i both come with a 9×50 straight-through finderscope. This finder works well, but I hardly need it, thanks to the IntelliScope feature. A red dot sight will work just as well, as will a Telrad.
The included collimation cap with the XX12i is somewhat of a joke. I came to the conclusion that I’m better off collimating on a star or using a laser collimator.
The Orion Intelliscope Feature
The Orion IntelliScope system is extremely simple to use.
Alignment just requires entering the time, date, and location and aligning the scope on two reference stars. After that, the IntelliScope pretty accurately leads me to any object I choose.
The scope works fine without the IntelliScope as well. I can point it at a target by hand without messing up the alignment or accuracy of the IntelliScope.
Should I buy a Used XX12i?
The XX12i is a great telescope, but given its high cost and the relatively complicated nature of its design, as well as the relatively exposed optics, care should be taken when shopping for a used one.
- Make sure that the Intelliscope system works, and if at all possible, try to check that the encoders are still accurate and have not been damaged.
- Check that the base has not been chipped and that the MFC/MDF isn’t swelling.
- Verify that the mirror coatings aren’t thinning or corroding, and inspect the truss poles for any damage.
If you’re confident that all of the aforementioned are in good shape, then you’re good to go.
Aftermarket Accessory Recommendations
We’d definitely recommend adding some better accessories to the XX12i. It’s severely limited by its included eyepieces.
But before you think about any of those, you need to purchase the XX12 light shroud. It’ll greatly reduce the amount of stray light that can get into your telescope and hamper contrast or cause glare issues. Along with that, the shroud prevents dew, dust, dirt, and insects from getting on your optics while you use the telescope. Even if you don’t live in a light-polluted or damp environment, the shroud cuts down on even the faintest background sky glow from starlight and atmospheric scattering and insulates the cold metal truss tubes for a more comfortable user experience.
As for eyepieces, for low magnification, an 82-degree eyepiece in the 20mm to 30mm range would be our pick and probably the first thing you should upgrade. Our favourites are the Explore Scientific 82-degree, but you could splurge on something like a 22mm Tele Vue Nagler if you feel so inclined.
Next would be a medium-power eyepiece in the 16mm to 12mm range. Another ES82, UWA, or Nagler will do it, but if you’re on more of a budget, a Baader Hyperion or a 16mm Explore Scientific 68-degree will work nicely.
Lastly, you’ll need a high-magnification eyepiece in the 6mm to 10mm range (or preferably two separate eyepieces at either end of that). Any of the eyepieces from the aforementioned lines will work, but our favourite would probably be the 6.5 mm and 9 mm Baader Morpheus.
A UHC filter significantly boosts contrast on nebulae with the XX12i under light-polluted skies. It’ll actually help quite a bit with contrast under dark skies too. A 2” filter can thread onto the included 2” to 1.25” adaptor for use with 1.25” eyepieces.
Normally we’d recommend supplementing the included 9×50 finder with something like a Telrad or Rigel Quikfinder, but as you’re only going to need the finder at all to align the Intelliscope system when you set up the telescope, you probably would be better off spending your money on other items.
What can you see?
Mercury and Venus are, of course, completely blank apart from showing their phases through any telescope.
The Moon shows details as small as a mile across and is dazzlingly bright through the XX12i. Some users might want to use a moon filter to cut down on the brightness, though at moderate to high magnifications your eyes should adapt pretty quickly.
Mars sports a few dark albedo features (in reality, dark patches of sand/dust on its surface) as well as the ice cap when it’s around opposition. With some techniques to reduce Mars’ glare, you can spot Phobos and Deimos when they’re at maximum elongation from the planet.
Jupiter’s two main cloud belts are extremely obvious through the XX12i, and you can also spot its polar zones and other features, including the Great Red Spot (Jupiter’s weather is always changing). Its 4 largest moons, the Galilean moons, are clearly not stars and cast tiny shadows as they transit the planet. On very steady nights you can tell that they have slightly different sizes and colours.
Saturn and its rings are fantastic with the XX12i. You can easily see the Cassini Division, and with steady seeing and good collimation, the Encke Division can just be glimpsed. At least 5 or 6 of Saturn’s moons are also easily visible.
Uranus and Neptune are little more than turquoise and azure dots through the Z12, but their moons are visible. Uranus’ moons Ariel, Umbriel, Titania, and Oberon are about as dim as Pluto and require a careful eye to be spotted, while Neptune’s lone large moon Triton is quite easy to spot.
Pluto can be spotted with the XX12i under decent skies – but don’t expect to see anything more than a faint star-like point. The Intelliscope will get you in the vicinity of Pluto on its own, but you’ll need to carefully consult charts or sketch the region over a few nights to determine which dim “star” is actually Pluto.
For optimal viewing of deep-sky objects, you’ll really want to bring your XX12i to dark skies; if you can, expect to see something like the following:
Galaxies – Many of the brighter galaxies show a lot of detail through the XX12i. You’ll have a lot of fun browsing the many Messier and NGC galaxies that feature spiral arms and dust lanes, as well as spotting the H-II regions in M33, M51, and M101 under dark skies. The Virgo Cluster contains dozens of galaxies that are easy to spot, and with some luck you might be able to glimpse the faint members of the Perseus A and Coma galaxy clusters.
Globular star clusters – The XX12i resolves even the relatively faint globular clusters like M53, and you might get hints of colour and detail in brighter globulars like M15, M4, and M13.
Open star clusters – Even with lots of light pollution, open clusters are fantastic to look at with the XX12i. Even faint stars in clusters like M35, the Pleiades, the Double Cluster, and M6 will show colour and pop out against the background like jewels on black velvet.
Emission nebulae – The few bright emission nebulae that dot our skies (namely Orion, the Lagoon, and the Swan) are quite a sight to behold through the XX12i, featuring blue-green colours and detail that often exceeds what’s visible in photographs. A UHC filter will improve them even further – at the expense of any natural colour and many of the fainter stars in the field of view.
Planetary nebulae – Most of the easier-to-spot planetary nebulae are quite detailed and vibrant in the XX12i, and the Intellscope makes it extremely easy to locate the smaller ones which may not pop out while scanning for them at low magnification.
