Collimation (alignment of telescope mirrors and/or lenses) scared me so much that I opted not to buy a Newtonian reflector for my first telescope and ended up buying a not-so-great NexStar 4SE, a Maksutov-Cassegrain type of telescope that rarely needs collimation. Newtonians and Schmidt-Cassegrains are the telescope types that are most likely to lose good collimation, as they have the most moving parts.
However, later, I realised that collimation is nothing to be frightened of and is quite an easy process, even if it’s a Newtonian telescope. If I can assemble and set up my telescope properly, I’m also capable of collimating it correctly. It’s that simple.
Good collimation is required with any telescope or optical system to achieve good, sharp views across the entire field. Below is how I collimate my telescopes that belong to either of the 4 major telescope types: refractors, Newtonian reflectors, Schmidt-Cassegrains (SCT), or Maksutov-Cassegrains (Mak).
Newtonians are the most likely to need collimation. I recommend checking collimation every time you take your Newtonian out for observation, as there is usually a 50% chance it needs to be tweaked at the very least.
No matter what collimation tool you’re opting for, you need to know how to adjust the mirrors, both primary and secondary (only if needed).
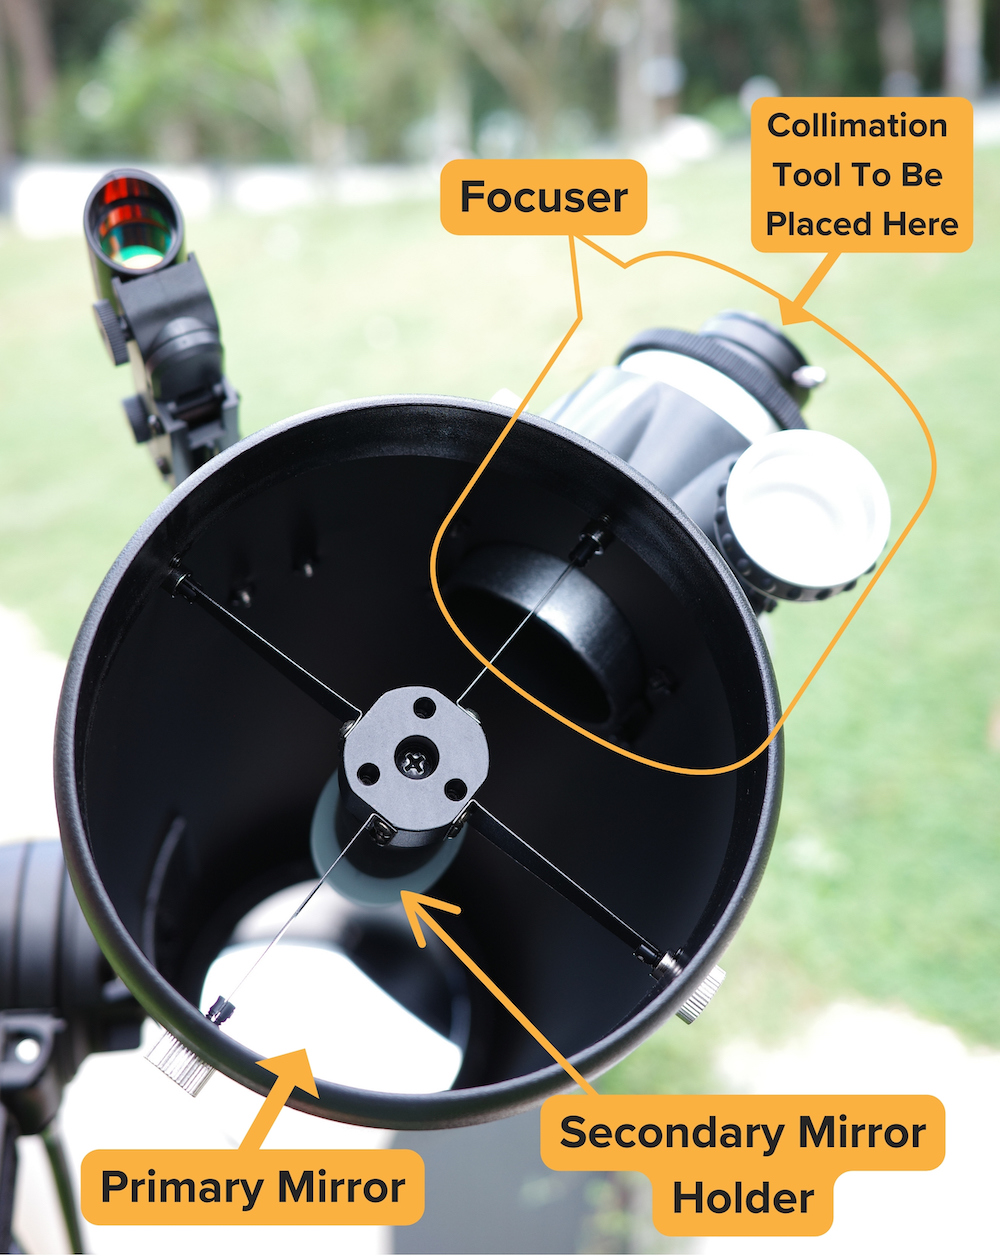
Barring a huge bump or similar, the secondary mirror in a Newtonian rarely goes very far out of alignment.
You can usually adjust your secondary’s tip/tilt with 3 or 4 small Allen or Philips head screws recessed in the spider/secondary mirror holder. You can rotate or move the secondary mirror up/down by loosening a center screw or nut and retightening it.
Be careful not to loosen it all the way, or your secondary mirror will fall onto the primary and damage both.
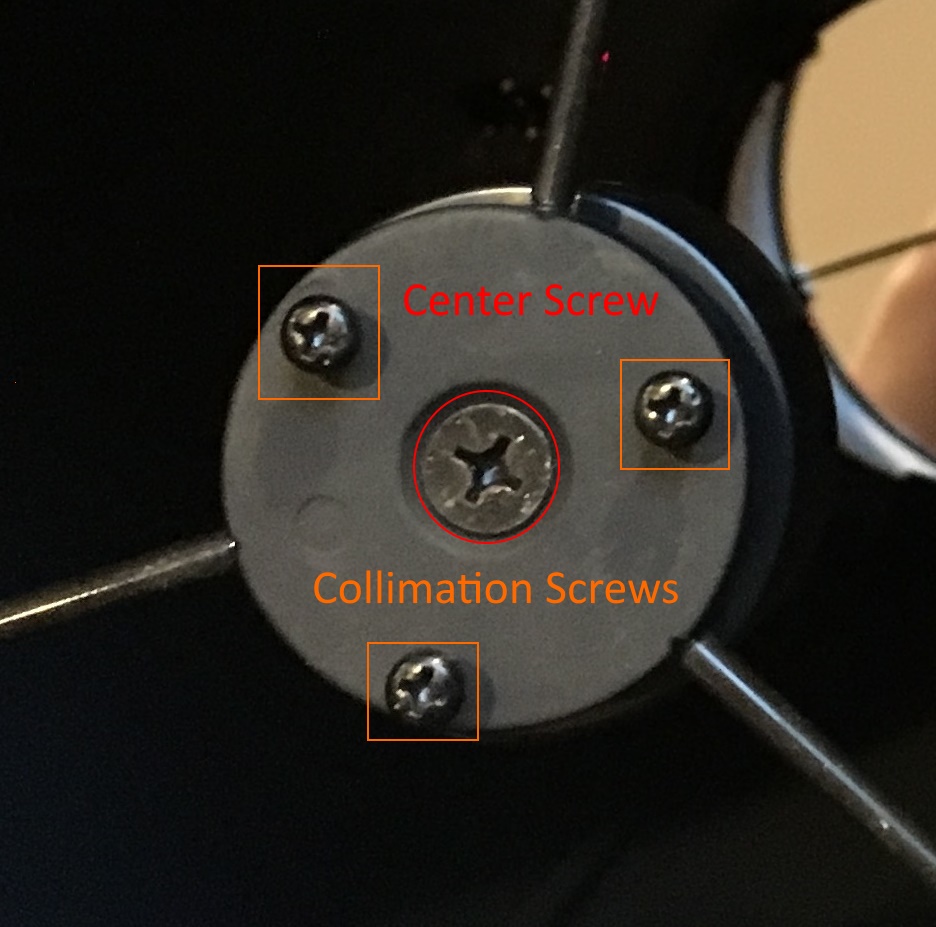
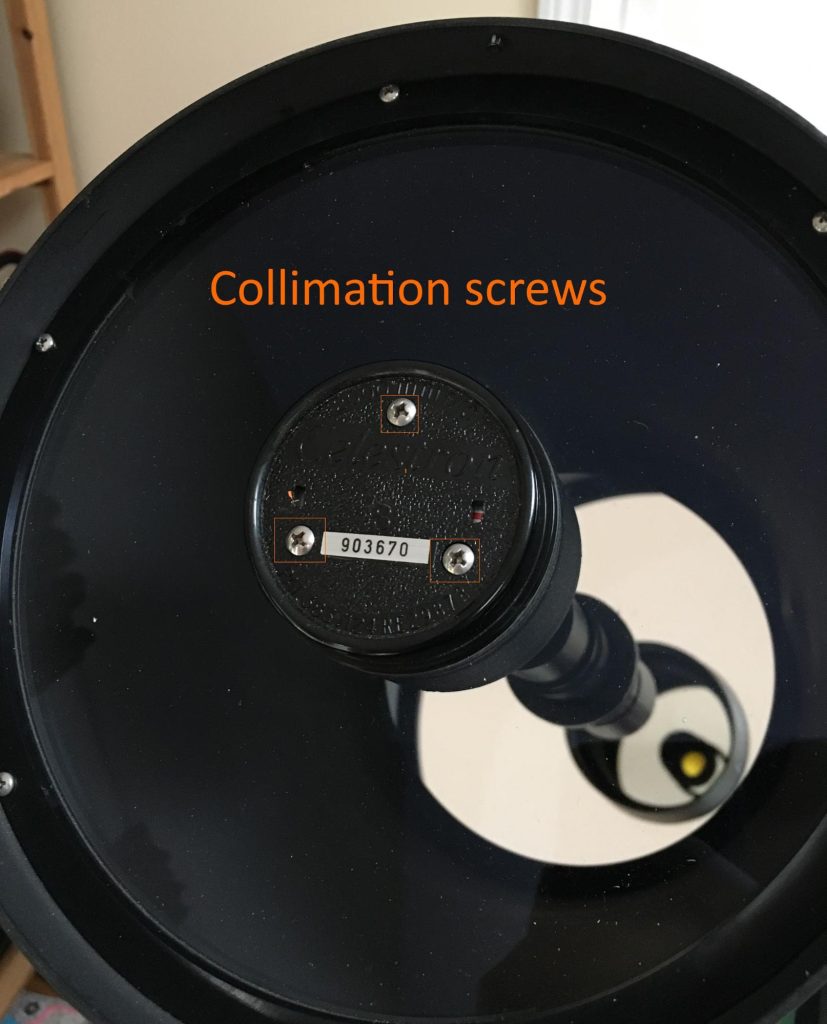
Your primary mirror will always have 3 collimation bolts/knobs at the back of its supporting cell. Adjusting the collimation bolts adjusts the tip and tilt of the primary mirror for alignment.
The primary rests on a series of supports on a ring or cell, which sit on springs that loosen/tighten when the collimation bolts are adjusted.
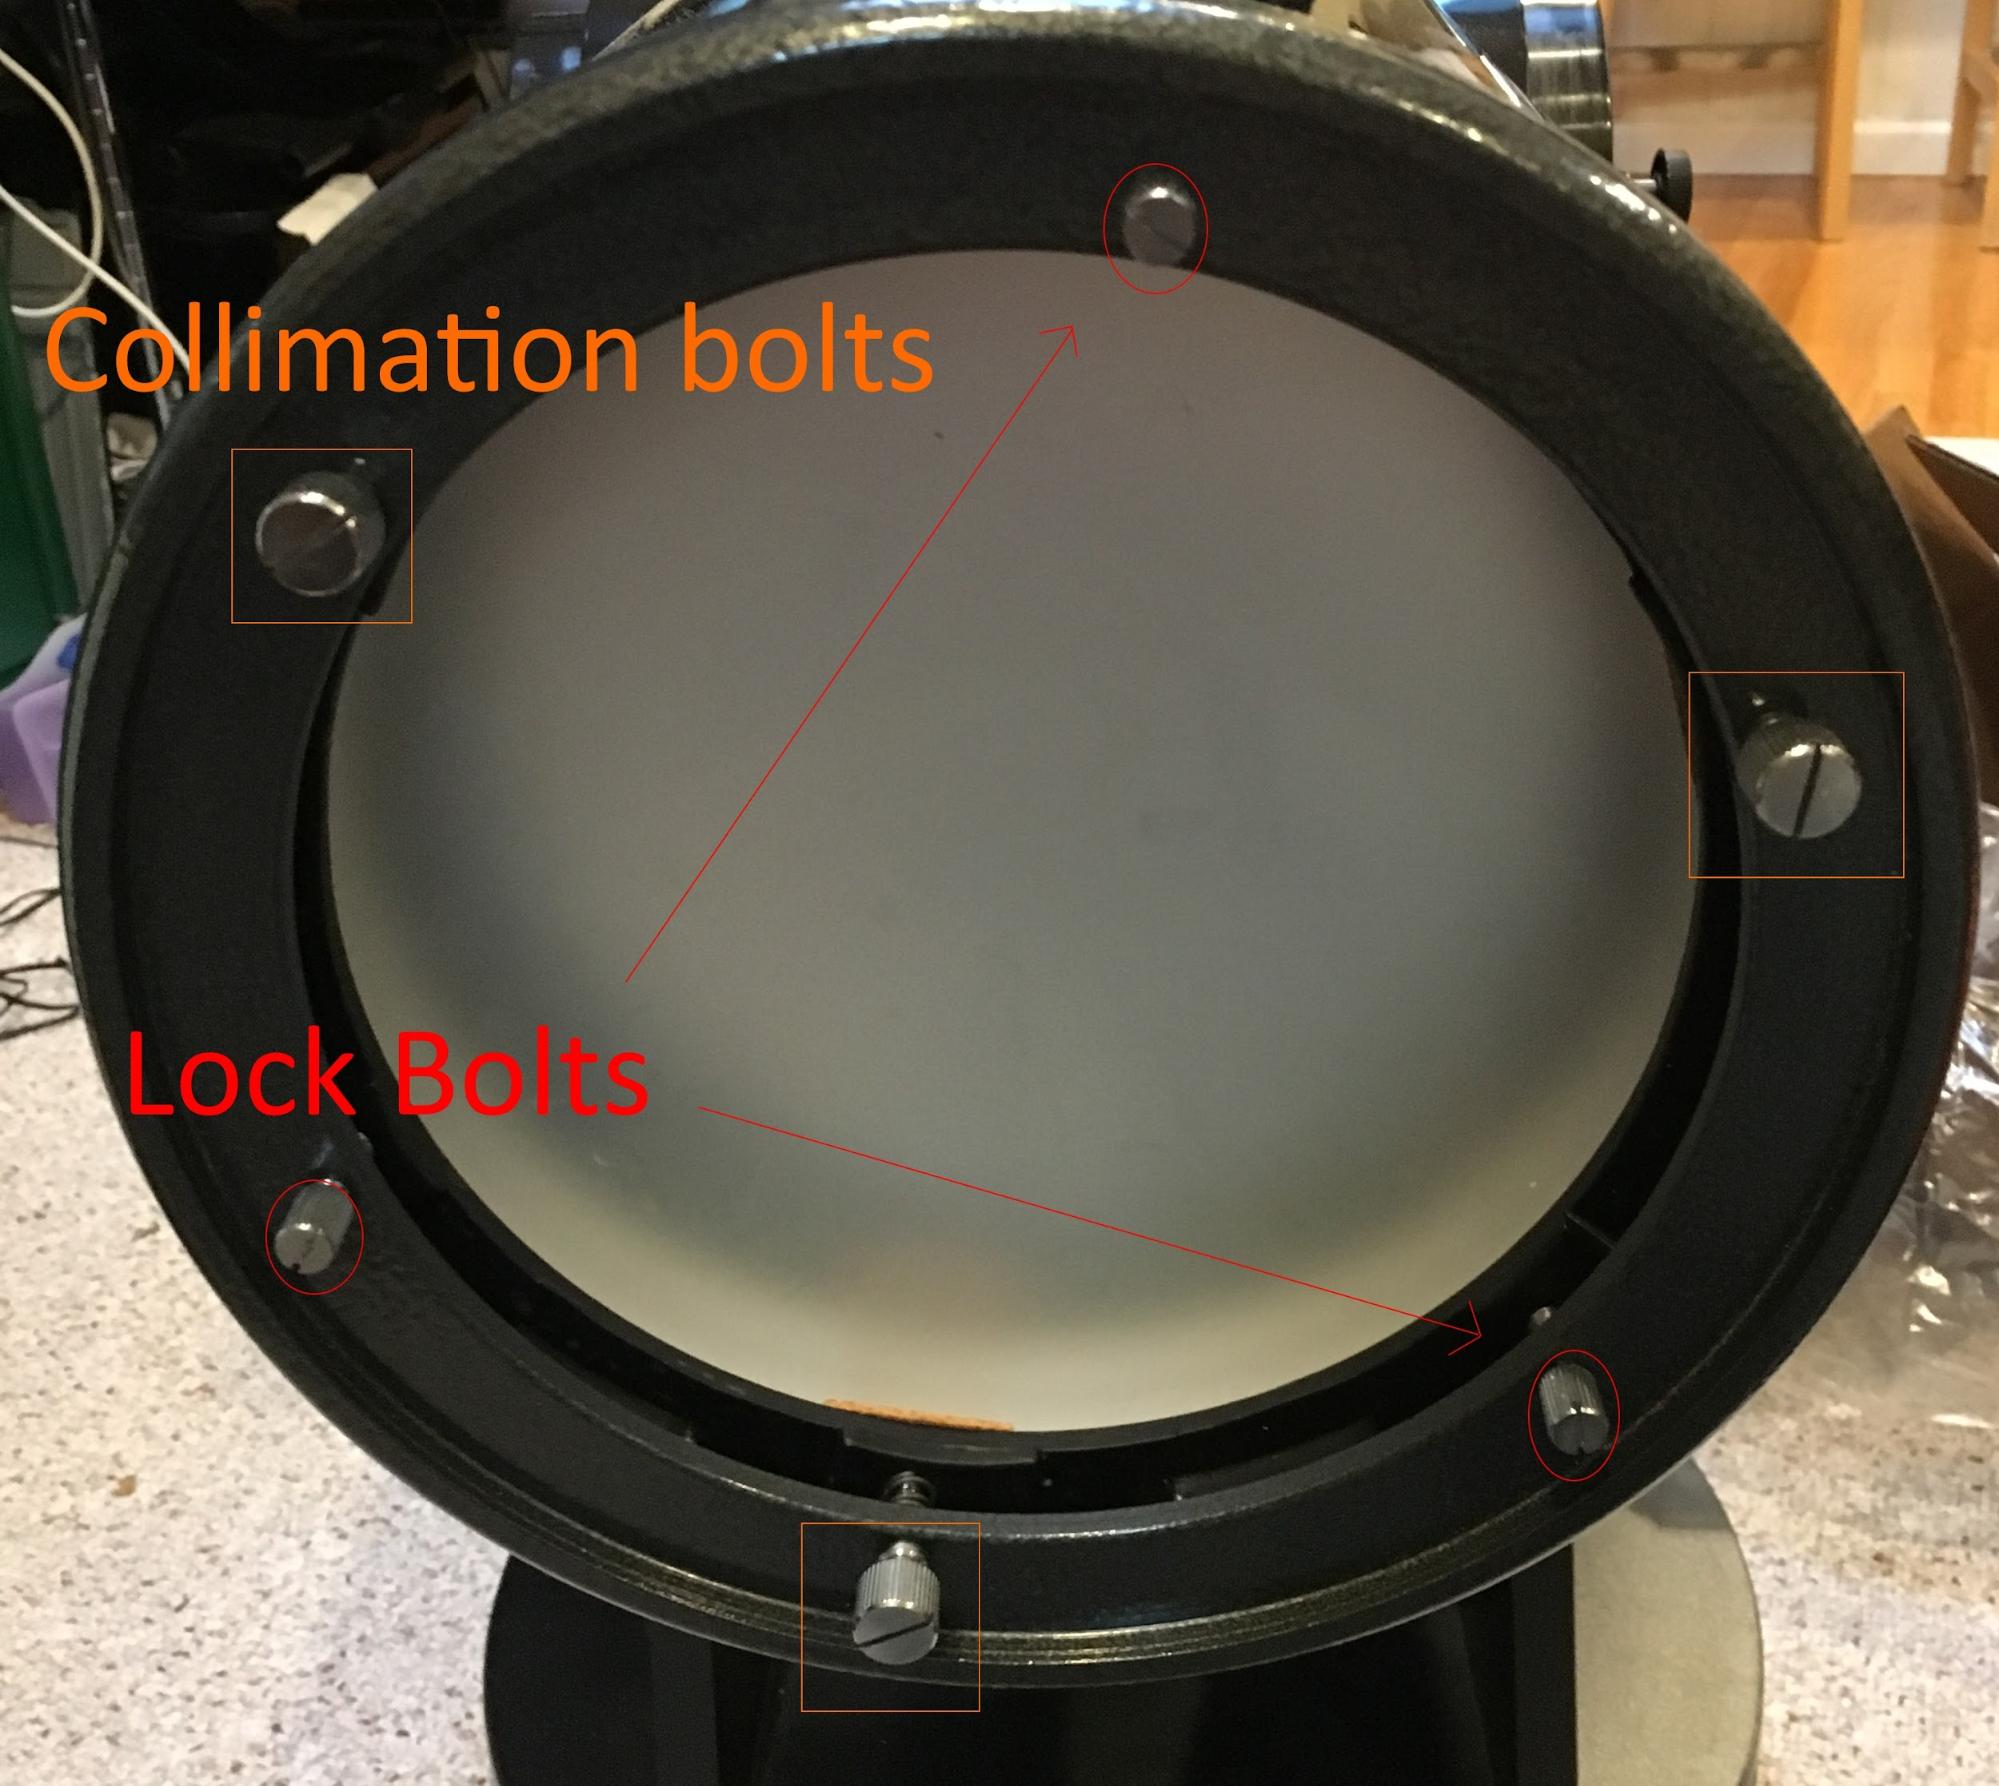
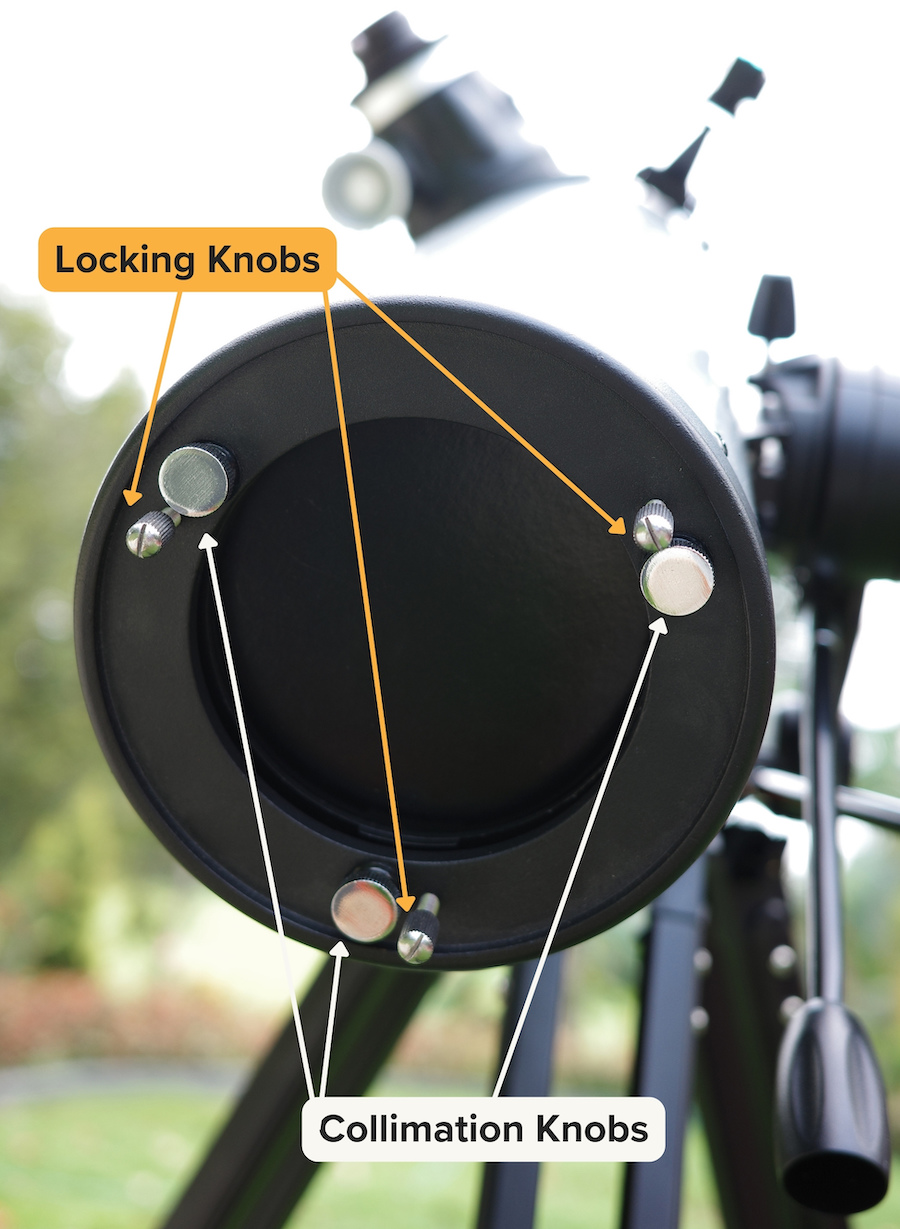
Most mass-manufactured telescopes also have 3 locking bolts or screws, which are, in theory, meant to keep the collimation more stable during usage.
In practice, these 3 locking screws do nothing and serve as a mere hindrance to collimation. In some cases, these could hit the back of your primary mirror if the scope is dropped and damage it as a result. I’d advise you to just remove the locking screws.
Methods for Collimating Newtonian Reflectors
Newtonians are unique in that you can collimate them with several different methods and tools.
I recommend using #1 or #2 and at least quickly checking with method #3 once you’re observing.
Collimation caps usually come with most reflectors nowadays, and if you lack one, you can get a film canister (rare these days), cut the bottom off, and poke a small hole in the lid just wider than your pupil to force you to centre your eyeball on it. Buying a Cheshire collimation eyepiece is probably preferable if you can afford it, though.
Collimating your Newtonian with a Cheshire or collimation cap is simple.
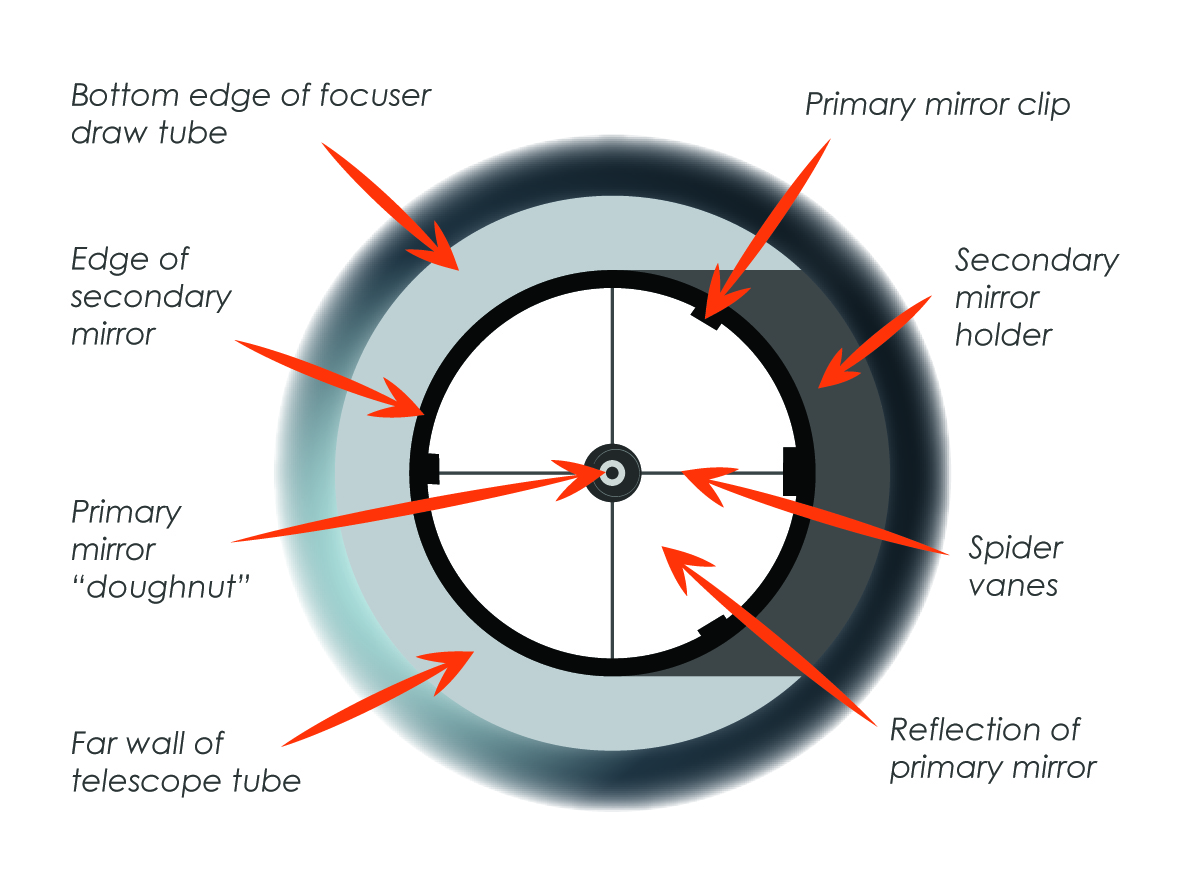
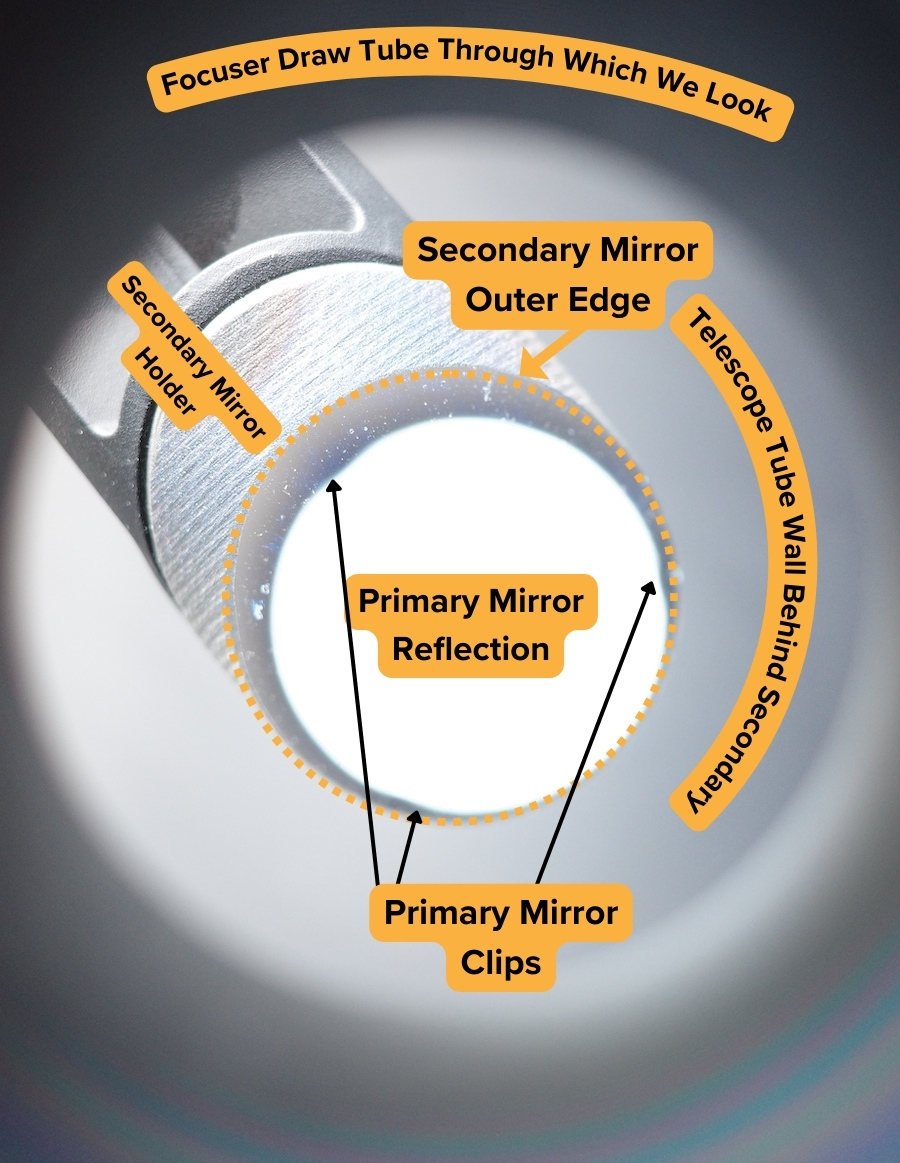
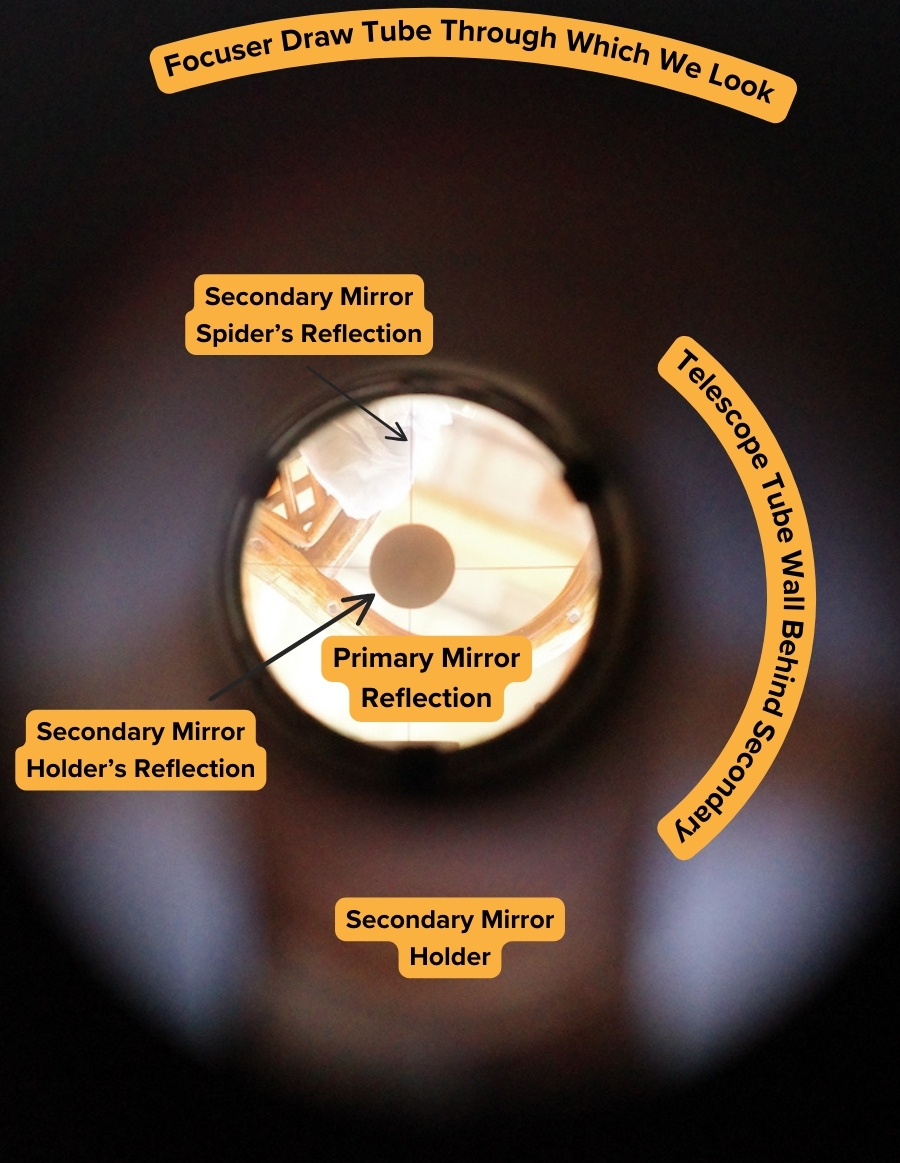
First, make sure the secondary mirror is aligned as in the below image. Your secondary is aligned if you can see the entire primary mirror and its three mirror clips with an even ring of the tube walls around it.
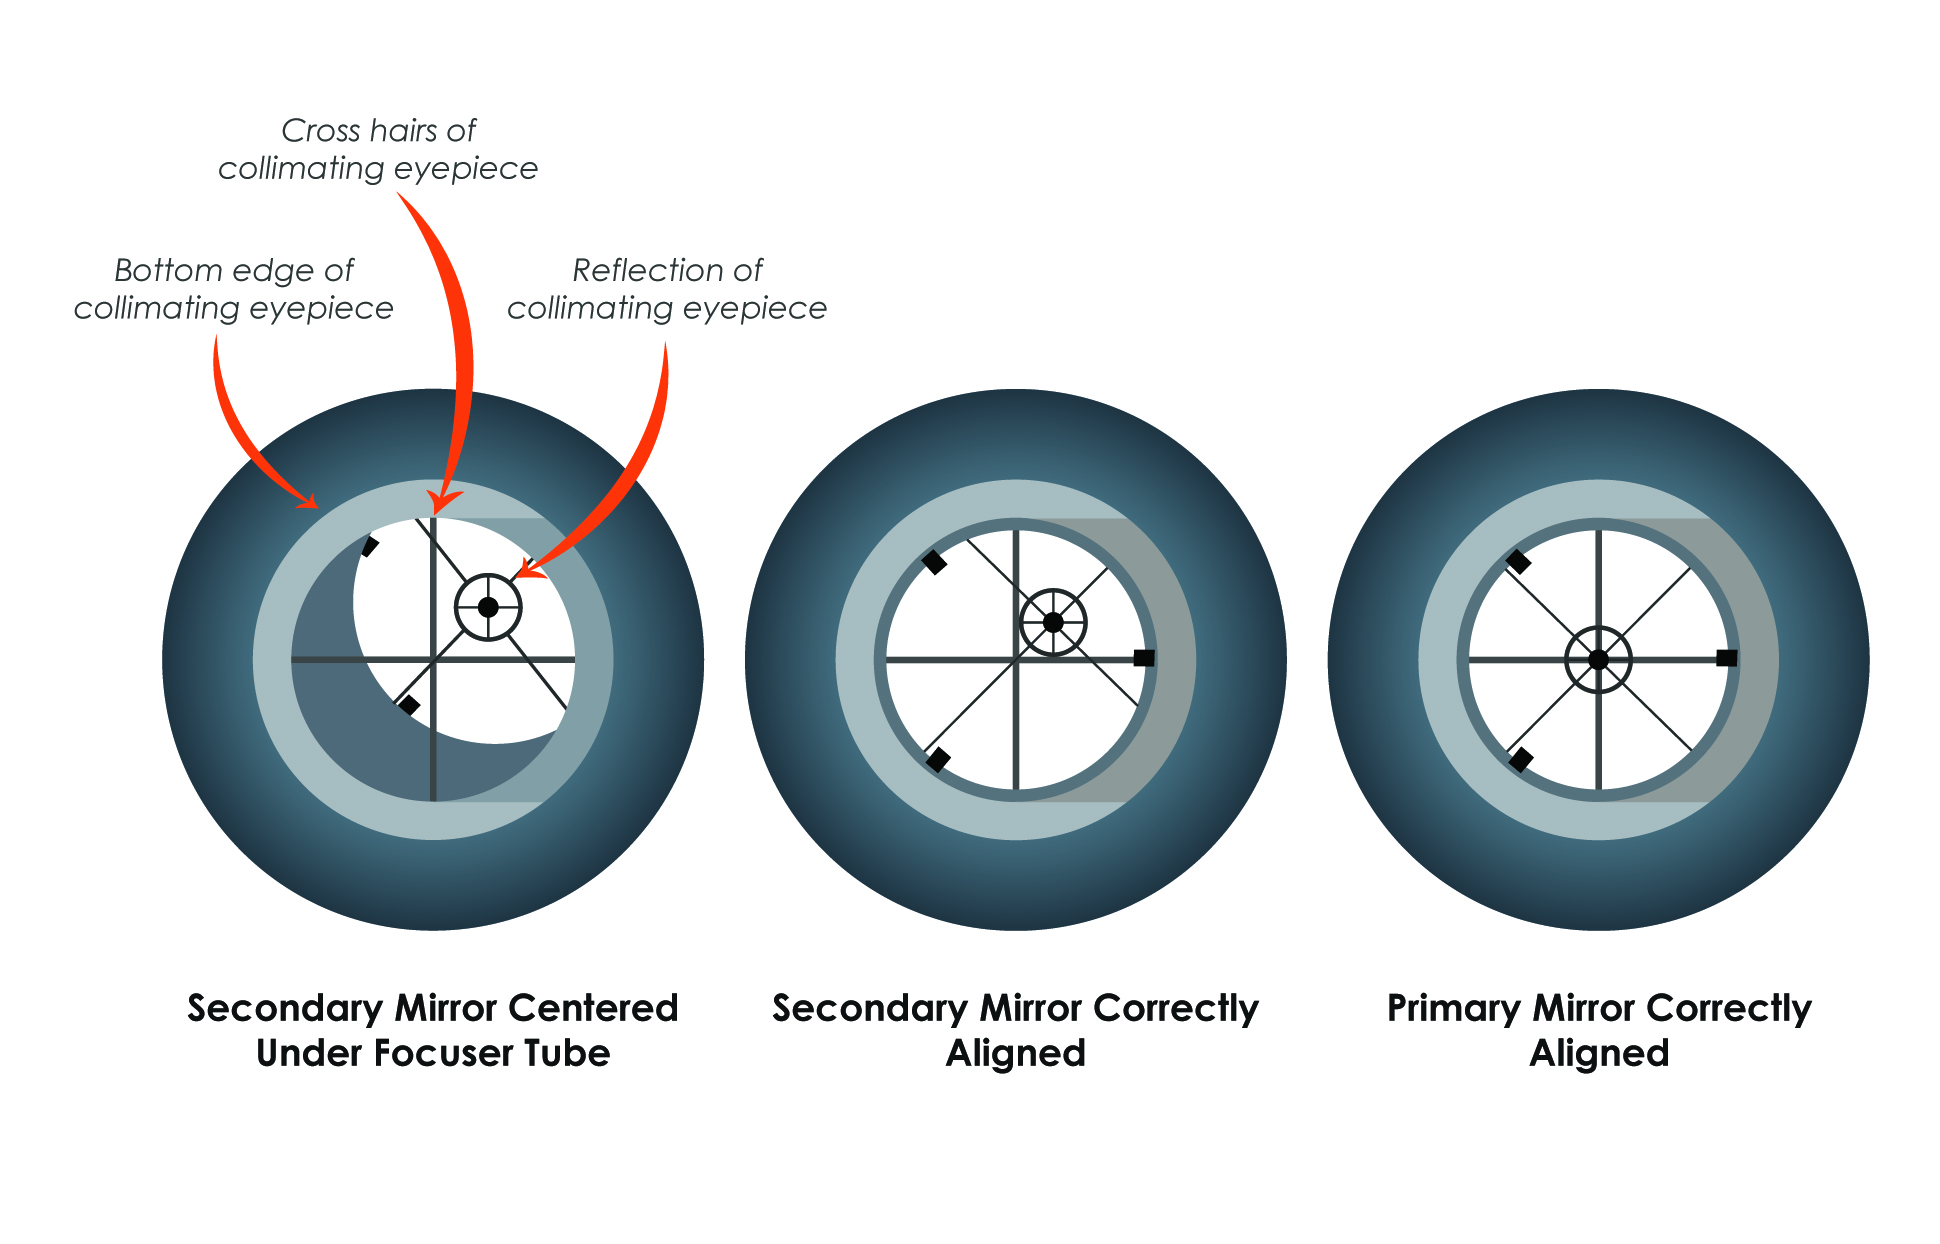
Next, you must align the primary. To align the primary, adjust the three collimation bolts until you have a view looking like this:
The secondary should be centred in the primary, and if you’ve done a good job aligning the primary, it should appear centred in your view as well.
Lasers can dramatically speed up collimation and are very simple to use. The only catch is that on many cheap lasers, the beam itself may need collimation! You’ll need to throw together some sort of simple V-block or jig (or use your scope’s accessory tray) and adjust the laser collimator’s small Allen screws until the beam/dot doesn’t move when the laser is rotated.
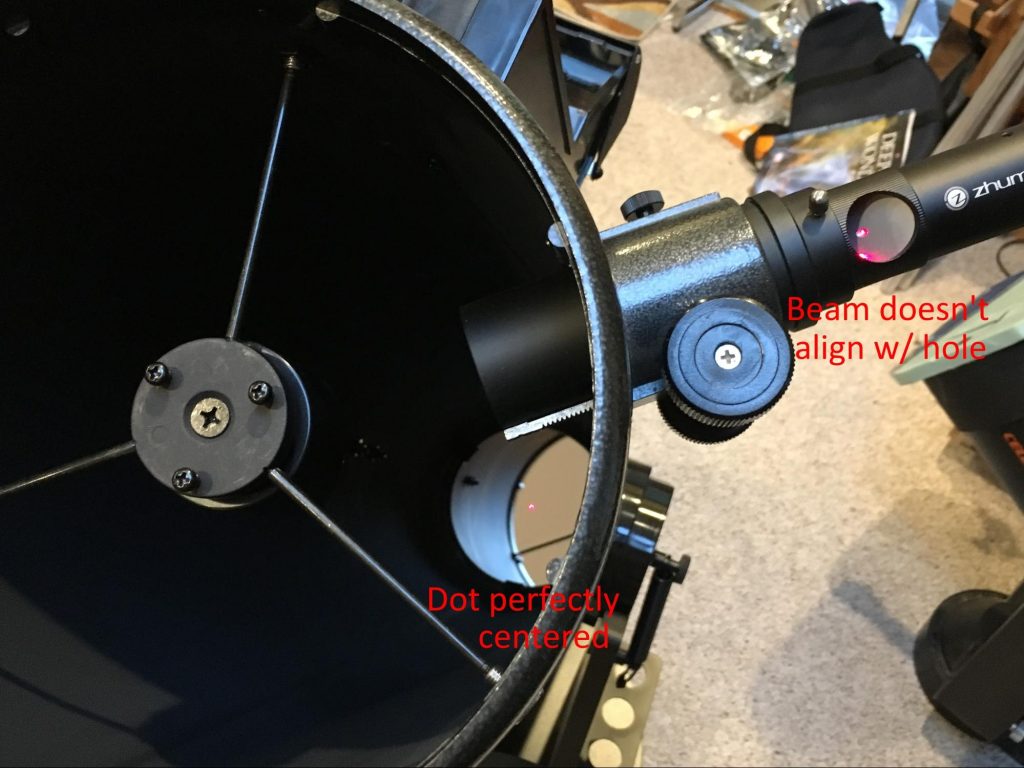
To align your secondary, turn the screws (if you need to) until the laser beam is centred on the primary mirror. Adding a centre dot of some kind to your primary can help with this, but I don’t find it to be a necessity.
Here’s what a scope with an aligned secondary and a misaligned primary looks like:
Now here’s what a perfectly collimated scope will look like with a laser:
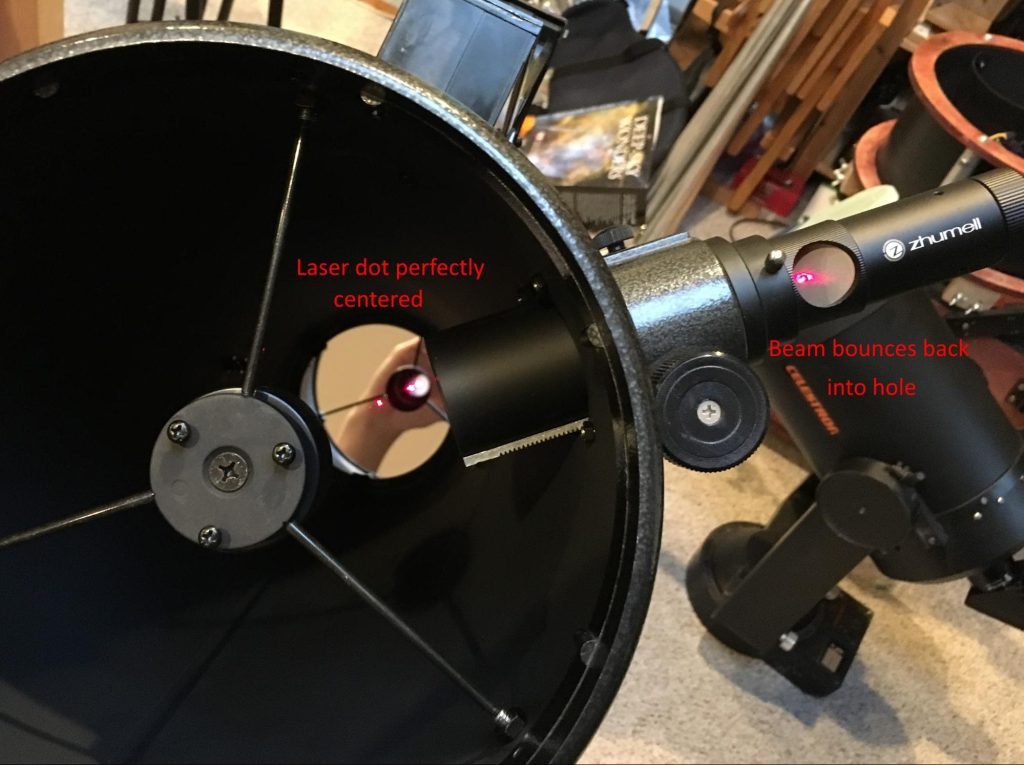
Notice how the laser dot perfectly hits the small hole it originates from.
More expensive lasers offer smaller dot sizes, reticles, holographic displays, etc. with theoretically more accuracy, but on almost all instruments I’ve found that the sub-$50 collimators work just fine once the alignment of the laser itself is tweaked.
That’s really all there is to it. Collimating with a laser is super easy.
Collimating on a star is a relatively simple, tool-free method, but with a long scope, it’s annoying to fiddle with the screws and then come back to the eyepiece.
However, I still recommend at least checking collimation on a star to be sure you’ve done a good job. Point your scope at Polaris if you’re in the northern hemisphere, or a bright star near the pole in the southern hemisphere, switch to a high-power eyepiece and slightly defocus it.
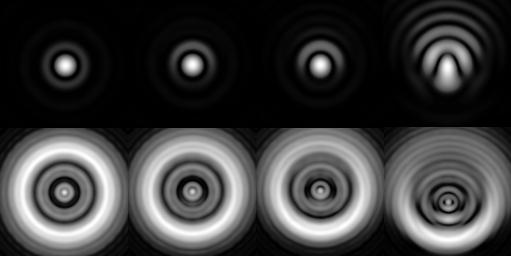
You should see one of the images below.
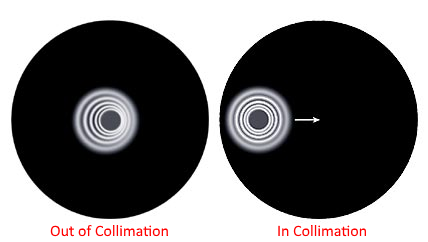
If the “doughnut” (the shadow of the secondary mirror) is centred on the diffraction rings of the star, your collimation is good. If it isn’t, adjust the collimation bolts until it is centred.
This may result in your target star moving outside the field of view, but it’ll always move in the direction the mirror has been tipped; if you’ve tightened a bolt, it’ll move in that direction, and if you’ve loosened it, it’ll move away from the direction of that bolt.
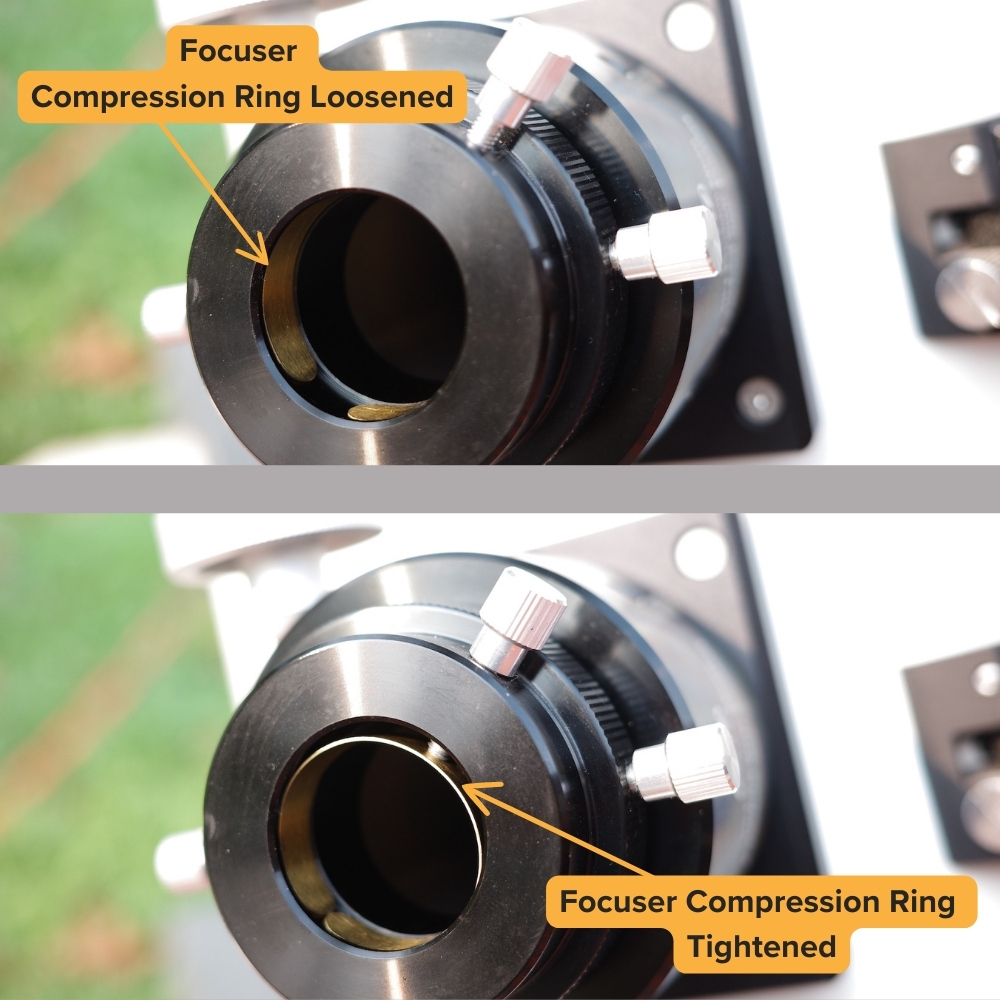
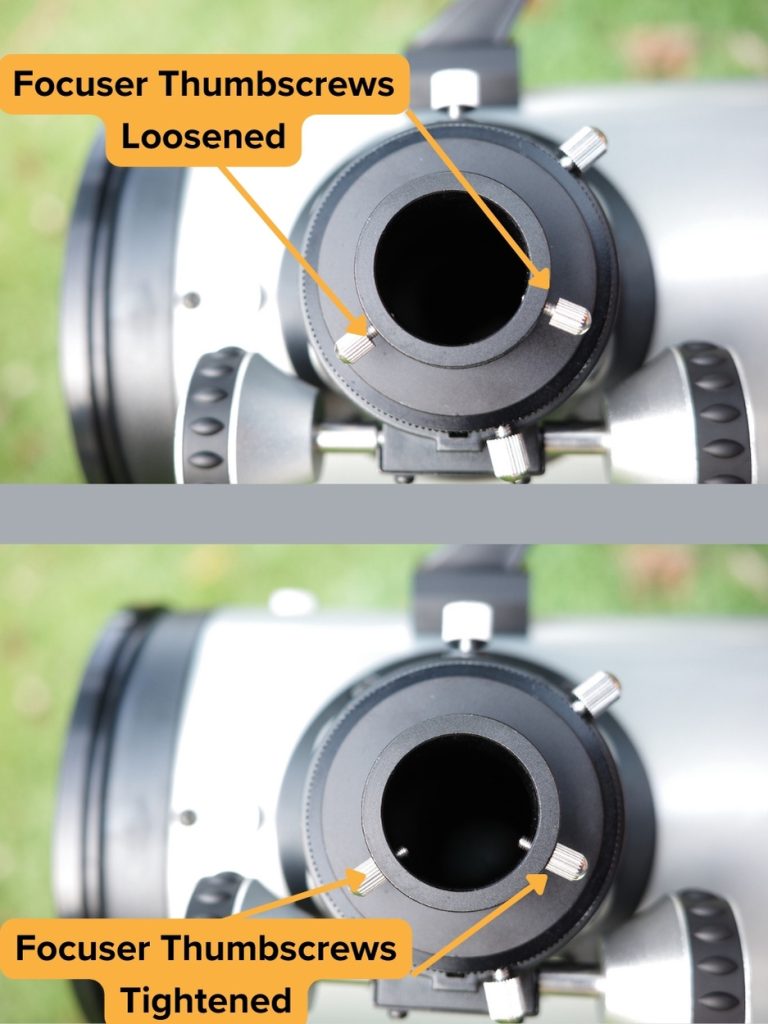
Before doing anything with your collimation tool, make sure it is square with the focuser and not tilted by the thumbscrew. I do this by pressing the collimator firmly into the focuser, then quickly tightening the thumbscrew. If you have a compression ring in your focuser instead of the thumbscrews, you won’t have to worry much about this issue.
Believe it or not, refractors can be out of collimation occasionally. Funny enough, I’ve had it happen more often with expensive refractors than cheap ones.
An out-of-collimation refractor will usually show elongated stars like coma in a Newtonian, like in the image below.
Adjusting the collimation of the objective lens is usually done with either 1 or 2 sets of 3 screws at the front of the lens cell, which can be accessed by pulling off or unscrewing the dew shield. Just adjust until the star looks perfectly symmetrical, both in and out of focus. If your refractor doesn’t have any screws in its lens cell, you’re out of luck.
SCTs don’t need collimation very often, but it’s still worth checking every session – particularly if you plan on doing astrophotography or high-magnification planetary/double star viewing.
The collimation process with Schmidt-Cassegrains is a little more tedious compared to a Newtonian, but it’s nothing to be afraid of.
You can’t really use a laser or Cheshire to collimate a Schmidt-Cassegrain, so collimating on a star is the only real option you have.
Pretty much all Schmidt-Cassegrain telescopes have 3 collimation screws on their secondary mirror holder.
The scope shown here oddly has Philips head screws, but most SCTs use Allen head/hex key screws. You can buy thumbscrews (sold as “Bob’s Knobs”, among others) to replace these, but I’ve found that the thumbscrews seem to work their way out of collimation more often and lead to people at star parties and outreach events ruining your collimation by fiddling with them.
Collimating an SCT on a star is a similar experience to a Newtonian apart from the adjustments requiring tools. Just defocus a bright star and adjust the screws until the “doughnut” is perfectly centred:
Keep in mind that even ¼ of a turn of a screw may be all you need due to the optical nature of SCTs.
There are some odd methods involving Cheshires and laser collimators to collimate SCTs, but it’s not as simple as dropping them into the scope like with a Newtonian, so I personally wouldn’t bother.
Maksutov-Cassegrains typically rarely need collimation. But if yours is out of collimation, you’re in luck.
Most Maks have small screws behind the primary mirror, which should allow you to tilt it. Apart from the collimation being done via the primary instead of the secondary mirror, the overall experience is basically like collimating a Schmidt-Cassegrain.